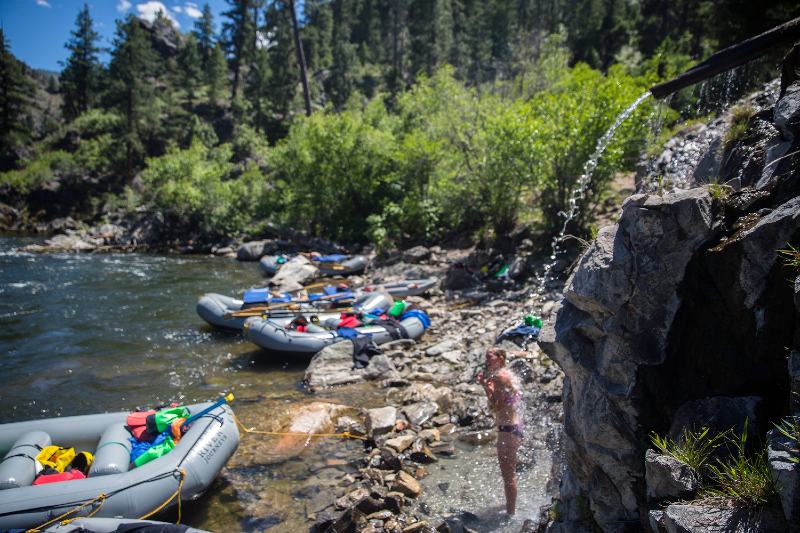
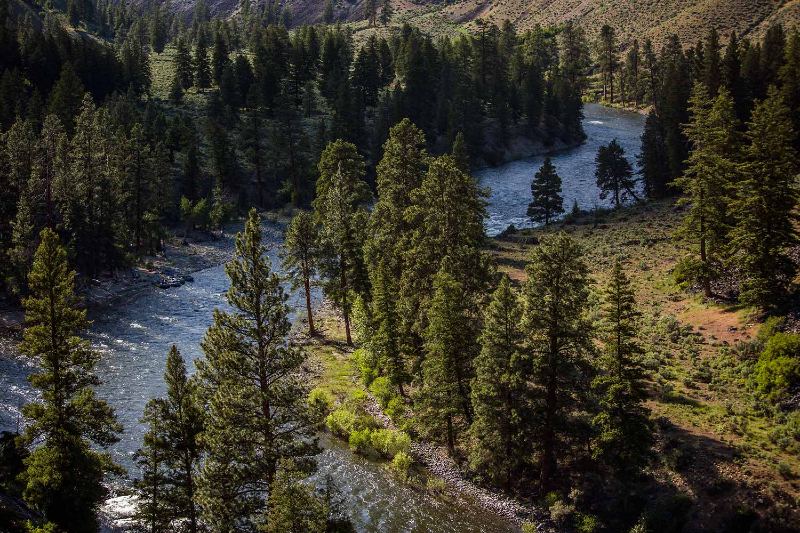
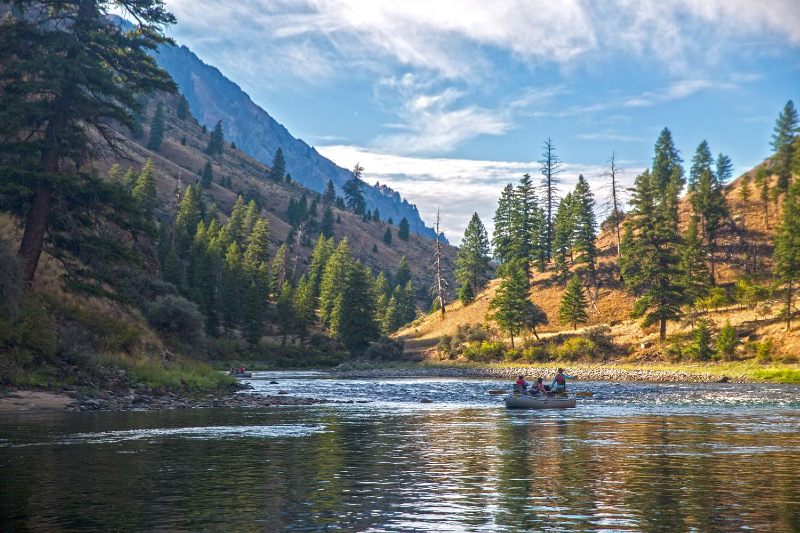
Frank Church Wilderness, Idaho
Middle Fork of the Salmon River Rafting Guide
The best multi-day rafting trip in America, the Middle Fork of the Salmon hits high points on every mark. Incredible scenery. Spectacular fishing. Hot springs. Fun rapids. Excellent hiking. Beautiful campgrounds. Moderate temperatures. And the list goes on.
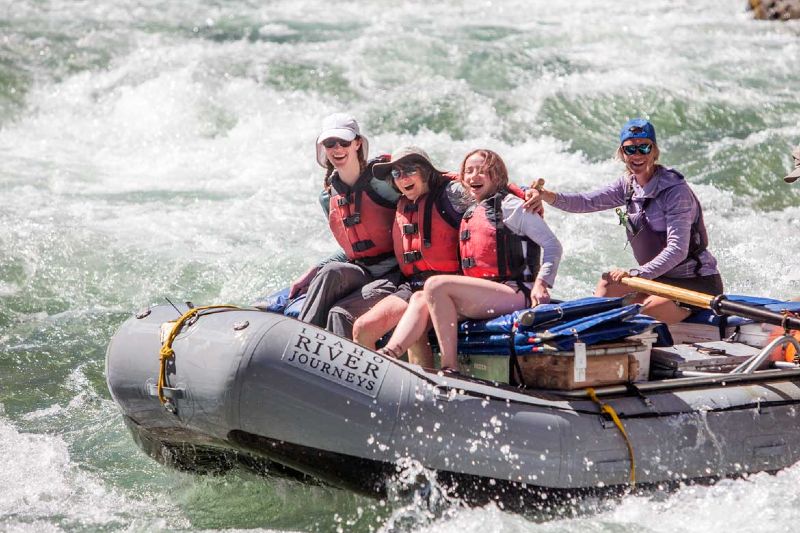
Idaho River Journeys has been running rafting and fly fishing trips on the Middle Fork of the Salmon for over 40 years. Learn more about Idaho River Journeys.
About this guide
This guide is from Boundary Creek to Cache Bar. It covers all listed camps, rapids, hotsprings, and airstrips. Most points of interest are listed such as pictographs, hikes, and interesting stops. The guide is broken up in three sections:
River Info
The Middle Fork of the Salmon is a nearly 100 mile stretch that flows north until its confluence with the Main Salmon river. It is a class II, III, and IV run and is typically a low volume river. The nearest town to put-in is Stanley, ID and for takeout, the closest town with amenities is Salmon, ID. Most groups opt for a six day trip, however, you can do up to eight, depending on your group size. Maximum group size is 24 people.
Safety
The Middle Fork is a free-flowing river, beginning at an elevation of 6,280 feet. Because of this, the water can be cold and fast and the rapids very large. In addition to this, the whitewater is continuous and not pool-drop, meaning a flip or swim at high flows will require you to actively self rescue. You should be a competent boatman if you are to row your own raft.
Permits
A Middle Fork permit is required year round. During the control season, May 28 – September 3, a permit can be applied for in the Four Rivers Lottery. The lottery application period is from December 1 through January 31 annually. More information can be found here.
Flying In
During low water, you may need to fly in to a lower put-in to begin your river journey. Indian Creek, 25 miles downstream of the Boundary Ramp, is the most typical airstrip for this. Many boaters consider the two-foot mark on the gauge to be the cutoff point for flying. Small boats and modest gear loads, on the other hand, can negate the requirement for a bush plane. Here is a link to the backcountry airlines.
4.8★★★★★ 25K+ Reviews
Rafting the Middle Fork of the Salmon? Our Middle Fork of the Salmon guide has you covered: 236 waypoints | Live, offline location | Community comments | 218 photos
$19.99 – Powered by FarOut
Boundary to Indian – Class II, III & IV
The upper section of the Middle Fork is low volume boating at its finest. The first five miles of this stretch are particularly steep.
Mile 0 – Boundary Creek Boat Launch:
River Left. The most common starting point for the Middle Fork. The put-in includes a ranger station, water fill, pit toilets, campsites, shuttle parking, and large eddy for boats.
Mile 0.06 – First Bend Rapid:
Class III. The first rapid of the middle fork. Most drop down the center channel and then navigate the bedrock walls below.
Mile 0.81 – Murph’s Hole:
Class III. Above 4 feet, there is a large hole at the apex of this turn. Hug the inside left corner for safe passage.
Mile 1.04 – Teepee Hole Rapid:
Class II. A low-water zig-zag through the left channel is required at very low flows once the right side is closed due to a bedrock shelf
Mile 1.04 – Teepee Hole Camp:
River Left. A small camp with a good eddy.
Morgan Ranch Airstrip:
River Left. This airstrip is a little off the river and up Sulphur Creek.
Mile 1.67 – Cable Hole Camp:
River Left. A small, rarely used camp above Dorr’s Rock. This camp is inaccessible at high water.
Mile 1.77 – Dorr’s Rock:
Class III. At higher water, run right of the rock, avoiding the cliff wall on the right. As water drops and the river channelizes, pull to the channel left of the rock.
Mile 1.92 – Sulfur Creek:
River Left. This creek includes access to the Morgan Ranch and subsequent airstrip.
Mile 2.50 – Pinball Eddy:
River Right. If the water is below 2.2 feet, this is a good eddy to pause at to give boats space for Pinball rapid, just downstream, as rafts are likely to get stuck here.
Mile 2.52 – Pinball Rapid:
Class III. This rapid becomes a test of boat maneuvering at low water. Start right of center, work to the left bank to find a small channel, then work back to center to finish it off.
Mile 2.94 – Gardell’s Hole:
River Right. This is a gravelly camp that gets better as the water drops. Guides are known to call it “the coldest camp on the river”.
Mile 3.03 – Sulfur Slide
Class III. This rapid changed from a debris flow in 2023. Lower Sulphur and Upper Sulphur are now one rapid, with the rapid going around the corner. If you’re going to scout, it’s best to scout on river right. (But you don’t necessarily need to between 2.5 and 6 feet.) Between 2.5 and 6 feet this rapid is fairly straight forward as a read and run, fun wave train. Below 2.5 the rapid gets very tricky because of all the new sharp rocks. Primarily at the bottom of the rapid boats are getting torn and getting stuck. Recommend to scout below 2.5 feet. Specifically the bottom half.
Mile 3.95 – Ramshorn Rapid:
Class III. On August 13, 2022 the creek at this rapid had a debris flow, making the river impassable for a period of time and altering the rapid. It will likely see significant changes in the future as the new sediment works its way downstream.
Mile 4.62 – Hell’s Half Mile:
Class IV. Recommend that you scout at any flow. At 3 feet and higher scout on the right. Below 3 feet scout on the left. At medium to high flows the entrance wants to push you right of the island which goes but there has been wood over there. If you go left, you need to hug the left bank at high water and punch lateral holes that want to push you right. At low water, scout on the left because the crux move is at the very top. There is a sharp, horn rock that’s 50 feet after the entrance that you need to go left of. To go left of it you need a right to left motion, but avoid hitting the wall. If you hit thew all you may go over the rock or wrap. Lots of oars have been snapping in this rapid. Once past the horn rock, the second half of rams horn is pretty tricky with a steep boulder garden.
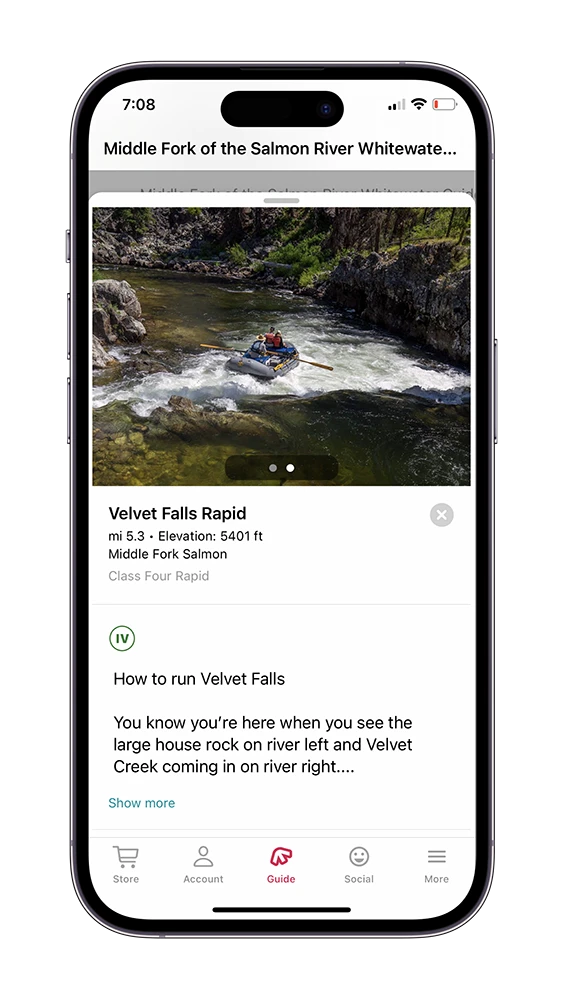
Mile 5.28 – Velvet Falls:
Class IV. In August 2023 a debris flow significantly altered this rapid.
Mile 5.62 – Boy Scout:
River Right. A small/medium camp that can be hard to spot from upstream. This is a common lunch stop to celebrate running Velvet Falls.
Mile 6.67 – Big Bend:
River Right. A great camp with a sandy pull-in. This camp offers shade, sun, and is set on a picturesque bend in the river.
Mile 7.26 – Trail Flat Hot Springs:
River Left. Located in the cobblestones at the camp, these small pools appear at lower flows.
Mile 7.26 – Trail Flat:
River Left. While the camp itself means a carry up to the bench above the river, the tradeoff is the opportunity to soak at the hot springs nestled on the back end of the cobble bar.
Mile 7.61 – Upper Chutes:
Class II. These two riffles become technical at low flows. Try and pick a left of center run in the first riffle and a center run in the second riffle after passing the boulder.
Mile 7.83 – The Chutes:
Class III. High water means a fun splashy read-and-run while low water requires dodging a big wrap rock at the top (on the left), then working back right to find the deeper, rock strewn channel.
Mile 8.04 – Lower Chutes:
Class II. Low water means finding a line somewhere along the right bank. Take your time and remember, the slower you go, the easier it is to get unstuck.
Mile 8.50 – Elkhorn Creek:
River Left. Elkhorn Creek enters the Middle Fork of the Salmon from the left-hand side.
Mile 8.85 – Rapid Camp:
River Left. This is a “new” camp that is across the river from Elkhorn Bar. It is very small and has been scouted by the USFS to fit up to five people during periods of low water.
Mile 8.85 – Elkhorn Bar:
River Right. Your marker for this camp is the large boulder in the river just upstream of camp. This large camp is spaced amongst the trees and while the downstream end was burned it still provides great groover locations.
Mile 9.73 – Saddle Camp:
River Left. This medium sized camp is on a bench above the river.
Mile 9.83 – Boot:
River Right. a small, easy overlooked camp on the bench above the river.
Mile 11.26 – Upper Powerhouse:
Class III. Run center and slightly left at high water. Run center to the right then back to center at low water. A large log pile on the left marks the end of Upper Powerhouse.
Mile 11.49 – Middle Powerhouse:
Class IV. High water means staying left for the entirety of the rapid and avoiding the wall at the bottom. At around 3 feet, there is more rock dodging and a trickier pull off the bottom wall.
Mile 11.72 – Lower Powerhouse:
Class III. At all flows pick your line to get right of the wrap rock left-of-center at the bottom. You can scout by parking on the cobble bar in the pool above.
Mile 12.07 – Joe Bump Cabin:
This Depression Era cabin gives insight into homesteading life on the Middle Fork. While the cabin is impressive itself, the diversion ditch carved by only a few men still leaves a long scar through the bench.
Mile 12.12 – Joe Bump:
River Left. This large camp has an easy eddy to miss at higher water so be sure to stay inside the bend. Take the time to explore the cabin just upstream of camp. The pretty creek on the other side of the river is called Soldier Creek.
Mile 12.56 – Sheepeater Island:
River Center. Also known as “Fake Fire Island” as some boaters will confuse this and the real one downstream. Low water forces you to go left of the island. Some brave oarsmen try to show off their finesse skills by going right, which often results in wet chacos.
Mile 12.76 – Thimbleberry:
River Right. This camp is hailed by a few as a “secret gem” for smaller groups. Others find themselves wishing for one of the larger camps in the area.
Mile 12.99 – Sheepeater Shallows:
Class I. Lower flows on the Middle Fork mean more features to navigate, including staying on the outside of this river bend.
Mile 13.14 – Scout Camp:
River Left This camp offers a variety of tent sites nestled throughout the shrubs and the ability to take the trail downstream to the hot springs.
Mile 13.41 – Sheepeater Camp:
River Left. There are a couple of pull-ins for different camp set-ups depending on the flow. The lower pull-in offers a great park and cook but closes off at lower flows.
Mile 13.41 – Sheepeater Hot Springs:
Cross the muddy tepid water to find a few pools of varying temperature. The springs also offer a better opportunity to spot wildlife thanks to the minerals around and in the springs.
Mile 13.6 – Sheepeater:
Class II. an easy read-and-run rapid, there are a few rocks that appear at lower flows.
Mile 14.14 – Fire Island:
River Left. A boulder stacked with a strata of high-flow logs mark the location to pull in left for this large camp. Unfortunately, fires burned the shade-providing trees in 2007.
Mile 14.46 – Fire Island Shallows:
Class II. At low water, it is necessary to pick your way left after this turn to find the deeper channel
Mile 14.73 – Lake Creek Shallows:
Class II. Almost immediately following the fire island shallows are the Lake Creek Shallows at low flows. Keep vigilant for sneaky shallow rocks and pick your way through the deeper channels
Mile 14.9 – Lake Creek:
River Right. Like many of the camps in this area, Lake Creek was burned in 2007. This camp can support a large group at all flows.
Mile 15.29 – John’s Camp:
River Right. While able to host a large group, this camp burned in 2007 and offers no shade.
Mile 15.99 – Greyhound Rapid:
Class II. A straight forward read-and-run, be careful of a large rock that becomes exposed in the middle of the channel at lower flows.
Mile 16.07 – Greyhound Camp:
River Right. This large camp is another one burned by the ’07 fires but it does offer a great swimming hole if the flows aren’t too high.
Mile 16.15 – Dome Hole Camp:
River Left. A small, burned camp that’s up on a bench.
Mile 16.83 – The Artilleries:
Class II. The Artilleries are a series of rapids that are hard to distinguish and are most challenging at low flows. They are spread out just over a mile and there are approximately three of them, but that’s subjective. Read and run and do your best through this challenging low water section.
Mile 18.52 – Rapid River:
River Right. Perched on the bench just downstream of Rapid River, this is the first camp in a few miles that offers shade.
Mile 18.56 – Rapid River Rapid:
Class II. This small wave-train remains fun at almost all flows.
Mile 18.9 – Mortar Creek Island:
Class I. Stay right of this island at low flows.
Mile 19.65 – Dolly Lake:
River Left. This camp features a great gravel bar on the bend of the river known as “Dolly Lake”. There are tent sites nestled up in the trees and at medium or lower flows a great boulder island forms to swim out to when the water is low and the temperature is hot.
Mile 19.83 – Big Snag:
River Right. This can be a quick landing at medium and higher flows. Look for the large dead tree that gives namesake to this camp and pull in right below it. There are tent sites throughout the trees behind camp and closer in the bushes. A great scramble can be done to the rock outcropping behind camp.
Mile 20.1 – Cannon Creek:
Class III. There is usually a hole in this rapid towards the bottom on the right. At high flows, you don’t want to touch it, but as the water drops, it becomes a fun feature.
Mile 21.67 – Lake Creek:
Class III. Marked by a sweeping left-hand turn, Lake Creek is dynamic and changes with the flow. There is a large hole on the right towards the bottom at high flows or more towards the entrance at low flows.
Mile 22.14 – Pistol Creek Rapid:
Class IV. Park well above this rapid on the right just after the hard right in Lake Creek to scout. This is an S-turn style rapid that has wildly different setups depending on the water flow. .
Mile 22.27 – Pistol Creek:
River Left. Perched on the confluence of Pistol Creek and the Middle Fork, this camp has many classic Middle Fork activities. Hike or fish Pistol Creek, explore the pools below Pistol Creek Rapid, and enjoy the easy park-and-cook of this camp.
Mile 23.1 – Ledge Hole:
A bedrock shelf extending from the left bank makes for a great surf hole.
Mile 23.16 – Pistol Creek Ranch & Airstrip:
River Left. You’ll notice cabins on river left. Just out of sight, there’s an airstrip behind these cabins. The main lodge is on the back of the property.
Mile 25.05 – Airplane Camp:
River Left. This camp requires a short but steep carry up the bank. Once there there is ample opportunity to spread out amongst the trees and great birding opportunities with all the snags across the river.
Indian Creek to Big Creek – Class II, III & IV
The middle section of the Middle Fork gives you a bit of everything: Incredible hiking, the best hot springs on the river, good fishing, sprawling camps and splashy whitewater.
Mile 25.56 – Indian Creek Airstrip:
River Left. The alternative put-in to Boundary Creek when people are looking to avoid the upper 25 miles whether due to early or late season factors.
Mile 25.56 – Indian Creek Guard Station Camp:
River Left. This camp has room for multiple groups and will often be used at high or low flows when trips are flying gear instead of launching from Boundary. A benefit of this camp is there is an outhouse here and water. The ranger station is just behind the airstrip.
Mile 26.09 – Indian Creek Bridge
Shortly after the Indian Creek Put-in, a small bridge passes over the river. This bridge was repaired in 2024.
Mile 27.01 – Indian Creek:
River Left. A large camp with a fast pull-in just above the Indian Creek confluence. This camp has great shade and fun exploration opportunities both up the creek and along the river.
Mile 28.06 – Anderson Camp:
River Right. This camp has low impact and is a hidden gem. The pull-in is just downstream of a small cliff wall and the camp is nestled in the bench above.
Mile 28.23 – Pungo Camp:
River Left. This large camp is also a popular stop as it provides access to explore the old Pungo Mine. Above the creek is off-limits to camping as there are Native cultural sites.
Mile 28.3 – Pungo Rapid:
Class II. Only really a problem at medium and lower flows, the bulk of the river gets pushed to the left channel, and a hole forms on the left bank. Avoid this hole and keep a close-eye on duckies.
Mile 29.16 – Orelano:
Class II. Higher water makes for a fun and easy read-and-run. Lower flows mean you must stay vigilant of rocks, stay right of center until the bottom of the rapid where you want to run the center chute.
Mile 31.57 – Little Soldier Rapid:
Class II. At low water, this sharp left hand turn requires you to navigate some rock ledges and generally stay river center as you go through the bend.
Mile 31.68 – Little Soldier Camp:
River Right. This picturesque camp has a large Ponderosa and perfect gravel beach. While a park-and-cook, most of the tent sites are back on the benches in the trees. If you walk downstream, there’s a beautiful Ponderosa grove on a flat bench a short ways from camp.
Mile 32.46 – Marble Left:
River Left. This camp can be accessed from either the top of the pool (best at high water) or below the small cliff which gives camp a great view of Marble Rapid.
Mile 32.49 – Marble Creek Rapid:
Class III. The weak-point in this wave is just left of center at all flows. Often times, the surfing here is great and offers eddy access and makes for a great time if camping at Upper Marble Camp.
Mile 32.72 – Marble Right:
River Right. This picturesque sandy beach requires a relatively strong pull-in to break through the eddy line. At medium and higher flows, be sure to aim high. If your group is bigger, save the beach for your kitchen and camp up in the trees.
Mile 33.07 – Ski Jump:
Class III. This can be a challenging class IV at very high flows or a fun class II low water maneuver.
Mile 33.67 – Sunflower Hot Springs:
River Right. Be ready to share one of the most scenic riverside hot springs around. Perched on a rock outcropping there are pools of varying size and temperature, including a hot water shower at the base of the cliff.
Mile 33.68 – Sunflower Flat:
River Right. This camp is only really suited for a small group and has been heavily impacted by people stopping for the hot springs. Be ready to share the eddy with hot springs soakers.
Mile 33.71 – Lost Oak:
River Left. This large camp gives the opportunity to stay close to the hot springs as well as bond with your river neighbors if anyone is camping at sunflower. The trade-off for this is the steep carry up to the bench.
Mile 33.73 – Sunflower Gravel Bar:
Class I. As the flows drop be sure to take the channel next to the left bank and not get suckered into the dry right “channel”.
Mile 34.45 – Middle Fork Lodge Bridge:
This bridge connects the Middle Fork Lodge and the downstream airstrip. The flow gauge is located just upstream of this on river left.
Mile 34.5 – Middle Fork Lodge:
River Right. The Middle Fork Lodge offers excellent accommodations alongside the Middle Fork of the Salmon.
Mile 35.22 – Thomas Creek Gravel Bar:
Class I. As the river drops, take the furthest left channel to avoid taking a route that ends in dry rocks.
Mile 35.54 – State Land Left:
River left. This huge camp has a park-like setting with the right amount of perfectly spaced out Ponderosas. You can park on the lower beach closer to the river bend until the water drops at which point you will need to park higher up to avoid a camp exit that includes pulling boats upstream.
Mile 35.67 – State Land Right:
River Right. This pull-in feels fast at all flows. When the water drops, guard rocks prevent you from hugging the safety of the shore. Be wary of the large snag that likes to sway heavily in the wind.
Mile 36.05 – Little Creek Bridge Camp:
River Left. This is located just upstream from the bridge. While the bar is all cobble stones, there are nice tent sites behind this.
Mile 36.07 – Little Creek Pack Bridge:
Bridge connecting the guard station to the airstrip.
Mile 36.07 – Thomas Creek Airstrip:
River Left. This is a busy airstrip during low flows. This is a well-maintained airstrip that’s just over over 2,000 feet long.
Mile 36.07 – Little Creek Guard Station:
River Right. The Little Creek Guard Station is just across the river from the Thomas Creek Airstrip.
Mile 33.6 – Little Creek:
River Right. After passing the cabins, pick a landing zone amongst some fallen trees, camp is on the bench above the river. Try and find one of the biggest Ponderosas on the river around the cabins upstream for a nice stroll out of camp.
Mile 36.71 – Hood Ranch:
River Left. The island is your indicator to pull into camp. Below 3.5 feet, this camp is difficult to access.
Mile 37.99 – Jackass Rapid:
Class III. This rapid is formed by some rock ledges that sit right near where you need to go in the left channel. At higher flows, there is a right sneak that allows you to skirt over the cobble bar. As the water drops, the right channel closes off and the ledges come out, pull hard right of them. Watch for the downstream hole/rock before celebrating too early.
Mile 38.09 – Upper Jackass:
River Right. Pullover right after Jackass Rapid. This is a large, decent camp.
Mile 38.32 – Lower Jackass Rapid:
Class II. There is a pour-over at the bottom right that is only really a problem for inflatable kayaks.
Mile 38.56 – Lower Jackass:
River Right. This is a long camp with a nice gravel bar at lower flows. At flows about 4 feet this camp is inaccessible.
Mile 40.06 – Cameron Creek Pictographs:
River Left. Stop here and follow the well-worn trail to a rock outcrop that features numerous pictographs. Please don’t touch these pieces of history as finger oils can destroy them. On your way back down, see if you can spot some pit house remains on the lower bench downstream of the trail.
Mile 41.62 – Mahoney Creek Airstrip:
River Left. You won’t be able to see this airstrip from the river, but you will be able to see the windsock. The access for this airstrip involves a lot of uphill.
Mile 41.62 – Cougar Ranch Airstrip:
River Right. Closer to the river, this airstrip is opposite Mahoney and is easier to get to.
Mile 42.24 – Mahoney Camp:
River Right. This camp is great for a small group, it has a wonderful swimming hole and lots of sun, providing for a great beach day.
Mile 43.19 – First Screaming Right Hand Turn:
Class II. At the apex of the turn is a far left channel that only appears when you are right on top of it. Don’t get suckered into dealing with the boulders that span from the center to the right bank.
Mile 43.51 – Pine Flat Rapid:
Class II. The water channelizes into a fun slide that then pushes into a boulder. Stay to the right to avoid this boulder.
Mile 43.7 – Pine Flat Camp:
River Right. This camp has a short but rocky carry from the boats to the flat bench, but once up, there is plenty of room to spread out.
Mile 43.85 – Lower Pine Flat:
Class II. This rapid is only a problem at low water. Two options exist. You can enter left and stay left being careful of the bedrock section at the bottom or you can do a zig-zag move from the far left to the far right back towards the center.
Mile 45.86 – Culver Creek:
River Right. This camp with large trees (both dead and alive) fits best a smaller or medium sized group. The only problem is when the water drops and the shallowness of the river prevents you from parking at camp.
Mile 45.95 – Culver Creek:
River Right. This creek has a small waterfall that cascades into the river.
Mile 46.01 – Second Screaming Right Hand Turn:
Class II. Just like the first one, drift left and trust that a channel will allow you to fit through the rocks.
Mile 46.71 – Whitie Cox:
River Right. A large camp containing a great swimming hole, many tent sites (especially on the bench above the gravel bar), and a hot springs which has mites in it so we do not recommend soaking. Keep your eye out in the pool for enormous fish.
Mile 46.9 – Rock Island:
River Left. Creatively named after the large island of rock standing in the river, this camp has tent sites in the trees and a few camping restrictions due to the native cultural site close by. The landing for camp can change drastically depending on water flow.
Mile 47.85 – White Creek:
Class II. This rapid becomes trickier as the water drops. Follow the deep channel at the entrance to the left and stay river left for the majority of the rapid.
Mile 48.06 – White Creek Camp:
River Right. This popular camp has some cool tent sites tucked downstream amongst the maze of vegetation. While you cannot camp on it, check out the upper bench above camp for some native pit house remains.
Mile 48.48 – White Creek Bridge:
The Middle Fork trail crosses the river here.
Mile 48.69 – Shelf Rapid:
Class II. As the water drops, the river channelizes over some bedrock and creates fun waves.
Mile 48.79 – Shelf Camp:
River Right. After shelf rapid look for the large downed tree on the gravel bar. This campsite is on a treed bench and offers room for any sized group.
Mile 49.14 – Loon Cobble Bar:
Class II. As the water drops, the channels shut down from right to left until only the far left one remains.
Mile 49.55 – Jack Creek:
Class II. Not to be confused by the other, larger Jack Creek Rapid downstream, this Jack Creek is a Class II that requires a run through the narrow channel on the right, especially as the water drops.
Mile 50.06 – Big Loon:
River Right. This camp offers plenty of space as the gravel bar is massive. At higher flows, stay close to the right bank before the Loon creek confluence to make sure you don’t fly by camp. Expect to share this camp with people stopping here to explore the hot springs.
Mile 50.06 – Loon Creek Hot Springs:
River Right. Approximately one mile up Loon Creek you’ll find these hot springs. If you’re not camping at Big Loon, please park your rafts on the downstream end of the cobble bar.
Mile 50.3 – Lower Loon Creek Airstrip:
River Right. Park at Big Loon and access the airstrip behind the camp.
Mile 50.56 – Cow Camp:
River Right. This small camp offers great hiking opportunities to the Loon Hot Springs and surrounding trails.
Mile 50.67 – Cow Camp Rapid:
Class II. Low water causes this boulder field to appear.
Mile 51.0 – Underwater Canyon Rapid:
Class II. As the water drops, a rock ledge appears on river right. Stay left of center to avoid this.
Mile 51.1 – Underwater Canyon:
The calm section after the small rapid features an awesome canyon underwater. Rock ledges drop away at the center of the river leaving a deep ravine that is primed for snorkeling. Also here are some wonderful pictographs on the trail that leads to the cliff wall above the river. The pictograph site offers a great view of the canyon as well.
Mile 52.52 – Cave Camp:
River Right. While a small camp, it is sitting on a wonderful river bend and offers access to the hot springs across the river.
Mile 52.54 – Hospital Bar Hot Springs:
River Left. On the far upstream side of Hospital Bar camp is Hospital Bar Hot Springs. These springs are right on the river.
Mile 52.61 – Spatula Wave:
Class III. At medium flows, this can be a fun surf wave and a notorious ducky flipper. Stay left for the dry line.
Mile 52.72 – Hospital Bar:
River Left. River guides have been known to call this camp “inhospitable bar” after the wind that rips through here. However, this camp is spacious and has great access to the hot springs just upstream.
Mile 53.59 – Cub Creek:
River Left. This camp sits well above cub creek and can be easily missed.
Mile 53.88 – Cub Creek:
Class II. This easy constriction in the river becomes giant class IV waves at high flows. While big, the are generally forgiving and the hardest part is avoiding the banks.
Mile 56.77 – Upper Grouse:
River Right. This camp shares the same grassy flat as the lower camp. Depending on the water flow, you might want to park at the upper end of the beach to avoid getting stuck when leaving camp.
Mile 56.91 – Grouse Creek:
Class III. There are a large number of boulders that start appearing at medium and below flows. Be sure to stay on the right bank if you are trying to camp at Lower Grouse.
Mile 56.98 – Lower Grouse:
River Right. The landing for camp is in a tight eddy on the outside of the second turn of the rapid. Be sure to catch it. Camp has many tent sites in the trees bordering the river and a great big beach of mixed sand and cobbles.
Mile 57.02 – Tappan’s Cabin:
Fred and Daisy Tappan homesteaded here. While the Tappan’s are no longer here, the cabin is still in use, mainly by hunters, and offers insight into what it took to survive on a Middle Fork homestead.
Mile 57.41 – Tappan Island:
River Center. At higher flows, take the channel to the left of the island and park towards the top if you’re camping here. As flows come down, the only option will be the channel to the right of the island with tricky parking towards the bottom.
Mile 57.77 – Tiny Tappan:
River Right. This camp is not available at higher flows as it is underwater. This camp is only available for small groups.
Mile 57.79 – Tappan Canyon Rapid:
Class II. While not considered one of the “Tappan rapids”, this entrance rapid has a large ledge hole that can be missed by going left.
Mile 58.23 – Tappan One:
Class II. This rapid has a bottom wall on the right to watch out for at high water or a bottom hole in the center at low water.
Mile 58.41 – Tappan Falls Camp:
River Left. Although small, this is a great camp in the heart of Tappan Canyon and just above the rapid.
Mile 58.44 – Tappan Falls:
Class III. Scout Left. The line is on river right at all flows. It is highly recommended to scout to spot the tongue and analyze your set-up.
Mile 58.87 – Tappan Two:
Class III. There is a large center boulder that can either be fully submerged or fully out of the water. There is a picket fence or rocks after this necessitating further navigation.
Mile 59.03 – Cove Creek:
Class IV. At high water, pay attention to the boulder on the bottom left as the most important thing to avoid. Low water requires a narrow left entrance and the dodging of a shark-fin rock right in the center of the line.
Mile 59.83 – Tappan Four:
Class II. Dodge the big rocks. Any channel works.
Mile 60.38 – Camas Creek:
River Right. This scenic camp is on one of the larger tributary confluences of the Middle Fork. The creek offers great exploration and swimming while camp offers shade under some large trees.
Mile 60.4 – Camas Creek Riffle:
Class II. At lower flows, sticky bedrock shelves start to appear. The best line to enter inside left, following this deeper channel through the bend and generally left of center for the remainder of this riffle.
Mile 61.23 – Johnny Walker Camp:
River Left. Park along the cobble bar and set up your kitchen just upstream of the fallen logs in the shade of the trees. Campsites are dispersed in the grass and there is room for any sized group.
Mile 61.74 – Pool Camp:
River Right. Named after the perfect pool formed right in front of the camp, this camp was meant to instigate swimming. Camp is set up on the short carry to the bench and spreads-out downstream. At lower flows, there is often a beach or two to enjoy next to the river.
Mile 62.2 – Funston Camp:
River Left. There are spots closer to the boats to set up a kitchen and a lower beach as well if your group is very small. Campsites are up the short steep hill to the upper bench.
Mile 62.28 – Broken Oar Camp:
River Right. In view of Funston, this is a small camp nestled in some ponderosa trees that offers good hiking opportunities.
Mile 62.63 – Shark Fin:
River Left. Look for the shark fin shaped rock and you’ll know you’re here. Scramble over the large rocks to get to the overhang to enjoy these pictographs.
Mile 63.0 – Aparejo Rapid:
Class II. Spanish for pack saddle, Aparejo rapid will often leave unsuspecting boaters wishing they had their own saddle to hold on to. Higher flows leave a fun wave train but as the water drops, the rocks begin to rise. The crux is at the bottom left after the left turn where some exposed rocks make for a troublesome spot. Either stay left of it or run the ledges to the right of it.
Mile 64.03 – Trail Camp:
River Right. This nice flat camp close to the river offers many tent sites spread out among the shade of the trees. The carry is easy but the landing can be shallow at lower flows. For those looking for a challenge, there’s a great hike to Aparejo point, which is upstream behind camp.
Mile 65.07 – Sheep Creek:
River Left. This camp has a bit of a carry but offers plenty of space and ample hiking opportunities.
Mile 66.26 – Middle Fork Peak Look Out:
River Right. For a brief moment, if you look way up on river right, you’ll see a peak called The Middle Fork Peak. If you keep looking at this feature, you’ll notice a faint, square shaped box on its summit. (It’s pretty far away.) This is a fire look out tower, called the Middle Fork Peak Look Out tower.
Mile 66.36 – Flying B Island:
The river splits around an island just above the Flying B. At low flows you might be questioning yourself on which side to take. Go right.
Mile 66.46 – Flying B Ranch:
River Left. The famous Flying B Ranch has a small gift shop and even ice cream here.
Mile 66.6 – Bernard Pack Bridge:
This bridge measures 270 feet. In 2000, 150 MPH winds from a fire displaced it by four feet requiring significant repair.
Mile 67.3 – Flying B Airstrip:
River Left. Flying B Airstrip is owned by Flying B Ranch and is over 2,000 feet long. It is most often used by people staying at the Flying B Ranch, and much less often by rafting parties.
Mile 67.79 – Haystack Rapid:
Class III. Flows significantly alter the line in this rapid. At high water, the rocks here are submerged and turn into massive holes, with the rapid running straight into Bernard Rapid without a pause. Scouting is recommended at these flows. At low water, grind your way down the right side while reading and running.
Mile 67.89 – Bernard Rapid:
Class III. Low water makes this rapid more exciting as it closes off the left hand side and requires you to either enter left and make a strong move back to the right or enter right (often times the case if you rowed Haystack’s right line) and deal with a cut around a wrap rock.
Mile 68.3 – Bernard Airstrip:
River Left. This is the last airstrip on the Middle Fork.
Mile 68.47 – Bernard Camp:
River Left. This camp is often floated by without being noticed. It fits a large group and doesn’t have much shade.
Mile 68.53 – Short Creek:
River Right. This camp is hidden by the riverside vegetation and offers a short carry to the bench behind the trees. While the landing can be rocky, the camp is flat, grassy, and mainly sand.
Mile 70.35 – Earthquake Rock:
Class III. At high and medium flows there is a right line along the bank to avoid the Earthquake rock/hole. At medium flows this closes off forcing a left to right move around the rock. Low water you can go left or right of the rock.
Mile 70.8 – Jack Creek:
Class III. High water makes for an exciting ride. Low water necessitates a right-of-center run being ready to hit a few holes.
Mile 71.07 – Little Pine Rapid:
Class II. This is a fun read-and-run with a hole on the left that usually is runnable. The center line is the drier line at most flows.
Mile 71.2 – Little Pine Camp:
River Left. This camp has shade, hiking opportunities, and a nice layout. Most keep their kitchen closer to their boats in the sandy area with tents going up onto the grassy bench behind this. There is a popular and challenging hike located here, called Johnson Point.
Mile 71.29 – Lower Little Pine Rapid:
Class II. Boats have been known to flip in this rapid at high flows and wrap at low flows. Pay attention and stay left in this otherwise mellow rapid.
Mile 71.46 – Driftwood Rapid:
Class II. You can run left next to the cliff wall or center. Either way, avoid the massive rock at the bottom.
Mile 71.6 – Driftwood Camp:
River Right. This camp offers a mix of sand, shade, and sun. Contrary to its name, it is recommended to get firewood before arriving to camp.
Mile 71.7 – Lower Driftwood Rapid:
Class II. At medium flows and higher, there are large waves in here. At lower flows, read and run Class II.
Mile 72.49 – Wilson Creek:
River Right. This camp has a great sandy area for a kitchen right where you park. The tent sites are spread out following the trail downstream.
Mile 72.74 – Grassy Flat One:
River Left. This camp has plenty of room and lives up to its name.
Mile 72.93 – Grassy Flat Two:
River Left. This camp has a little more shade than Grassy One. Be careful of poison ivy in the cobbles when going from camp to your boats.
Mile 74.05 – Rattlesnake Cave:
River Right. There are some great pictographs in this overhanging cave.
Mile 74.42 – Survey Creek:
River Left. This picturesque camp is in a perfectly spaced grove of Ponderosas. This is a popular camp because it can accommodate a large group, is shaded, and has a swimming hole.
Mile 74.51 – Woolard:
River Right. Most park at the upper end of camp (before Woolard Rapid) and at the lower end (after the rapid) for high and low water respectively. Either way, the carry is easy and the campsites are on the long grassy bench behind the trees.
Mile 74.56 – Woolard Rapid:
Class II. At high water, there are some fun waves in this rapid, but watch out for the wall on the left bank afterward. Even at low and slow flows, it is possible to flip off this bottom wall.
Mile 75.31 – Fly Camp Rapid:
Class II. This is a straightforward rapid with a large rock left of center. Some call this Kimmel Creek rapid.
Mile 75.47 – Fly Camp:
River Right. This is a small but picturesque camp across from Kimmel Creek. The Middle Fork trail runs behind camp.
Mile 75.93 – Below Fly Camp Rapid:
Class II. At low flows, a rock poses a bit of a hazard in the center of the channel. Work left to stay away from this feature.
Mile 77.15 – Fish Camp:
River Left. Only available at lower flows, this small camp’s size is dependent on the gravel bar that forms at higher flows. If you look carefully at the mid-stream gravel bar that extends from this camp, you’ll get an excellent example of imbrication, which is the tilting of rocks so that they are arranged like roof shingles.
Mile 77.41 – Waterfall Creek Rapid:
Class III. Run right-of-center until the water drops to lower flows. At low flows, enter right, ferry left and make the slot between the center and left boulders.
Mile 77.6 – Waterfall Creek:
River Right. This is an awesome creek originating in the Big Horn Crags and tumbling steeply down to the river where it can be seen cascading over massive boulders.
Mile 77.77 – Big Creek Pack Bridge:
The Middle Fork trail crosses the river here and then heads up Big Creek, which is the Middle Fork’s official starting point of Impassable Canyon.
Mile 77.83 – Big Creek Camp & Big Creek Confluence
River Left. This camp is more often used to explore Big Creek or Waterfall Creek but can sleep up to four people. This is where the Impassable Canyon begins as the Middle Fork Trail exits the canyon at Big Creek.
Impassable Canyon – Class II, III & IV
Impassable Canyon features the most dramatic scenery change on the Middle Fork. Enormous canyon walls offer stunning views and plenty of waterfalls. Due to limited camps in this section, only one night per group is allowed in Impassable Canyon.
Mile 77.84 – Big Creek Rapid:
Class II. These boulders start to appear as the water drops and most find themselves navigating the channels left-of-center.
Mile 77.89 – Last Chance:
River Right. Starting below this camp the river is restricted to just one night per group until takeout. There is a small bench above the river here that lends itself to up to 20 people although this would be extremely cramped. This camp is recommended only if you have plans in the surrounding creeks/trails.
Mile 78.52 – Pine Bluff Camp:
River Left. This very small camp has a swift pull-in as it is in the water leading up to Cutthroat Cove Rapid.
Mile 78.58 – Cutthroat Cove Rapid:
Class III. High flows mean running a big wave train and looking out for the wall on the right. Low flows present a wrap hazard on a rock river center. It is easier to work with the water and go left of it even though the right side looks like it might have more room.
Mile 78.69 – Cutthroat Cove Camp:
River Left. This low-water small group camp offers a cool opportunity to camp across from Cutthroat Cove.
Mile 78.69 – Cutthroat Cove:
River Right. Cutthroat Cove is a beautiful overhung cove in between Cutthroat Cove and Lower Cutthroat Cove Rapids. There’s enough room for several rafts to fit in the cove.
Mile 78.73 – Lower Cutthroat Cove:
Class II. There are some fun waves to be had here at medium flows and is a straightforward read-and-run.
Mile 79.04 – Big Pine Camp:
River Right. This camp is nestled in a small tree grove and perfect for small groups.
Mile 79.1 – Big Pine Rapid:
Class II. Run center avoiding boulders and/or holes depending on the flow.
Mile 79.39 – Elk Bar:
River Left. This giant sandbar makes for a great camp. There are awesome views from camp, options to explore the steep terrain behind camp, and great swimming. The downside to this camp is the big last day of boating.
Mile 79.53 – Love Bar:
River Left. Just downstream from Elk Bar, this is a smaller beach also on river left.
Mile 80.18 – Veil Falls Rapid:
Class II. Run left-of-center at lower flows to dodge some rocks.
Mile 80.41 – Veil Falls:
River Right. This is a relatively short (10 minute) but steep hike up to the overhanging amphitheater that forms Veil cave. Coming off the top of this overhang is Veil Falls, a localized rain shower that sways in the wind.
Mile 80.61 – Wall Creek:
Class III. Stay right at all flows being careful not to hit the right side wall. There are usually fun waves in this rapid.
Mile 80.88 – Goalpost:
Class III. This is one of those rapids that gets bigger as the water drops and is non-existent at higher flows. The hit is runnable and recommended but can be missed by going left.
Mile 82.13 – Redside Camp:
River Left. This very small camp offers a unique spot to camp in the Impassible canyon as well as provides the opportunity to explore Golden Creek just downstream.
Mile 82.23 – Golden Creek:
River Left. Golden Creek enters the river at Redside Rapid. If you plan on exploring it, and you’re not camped out at Redside Camp, then use the eddy above the rapid to slow down and pull over. Only suggested at low flows.
Mile 82.23 – Redside Rapid:
Class IV. This rapid has several large boulders forming the rapid and can change drastically at different flows.
Mile 82.64 – Weber:
Class IV. At higher flows run slightly left of center. As the water drops, things become steeper. Enter left and work back towards the center as you descend the rapid.
Mile 82.85 – Mist Falls:
River Right. A great thin waterfall that can be either a raging torrent in the early season or just a trickle come August. Enjoy from the river or park on river right and proceed up a short scramble to get close to it.
Mile 82.96 – Mist Falls Rapid:
Class III. Enter right and work left then back towards center.
Mile 83.41 – Tombstone Pictographs:
River Left. A great pictograph panel is found at the base of this flat lichen covered wall.
Mile 83.51 – Tombstone:
Class II. At medium flows, this is a great read-and-run wave train.
Mile 84.01 – Papoose Camp:
River Left. This is a tiny beach that can fit just a few people. Beautiful camp otherwise.
Mile 84.12 – Ship Island Camp:
River Left. Large, beautiful camp across the river from Ship Island Creek. This is a long, thin camp with easy to spot tent sites spread upstream to downstream. Kitchen is upstream, then moving downstream chair area, tents and the groover site is located far down river behind a rock.
Mile 84.7 – Lightning Strike:
River Left. The lightning burned tree is where the name comes from. This is a small camp.
Mile 85.97 – Parrott Rapid:
Class II. The river jogs left and then right. At low water, there are small pour overs here. Read and run.
Mile 86.03 – Parrott Placer:
River Right. The main campsite has room for about eight or so tents, more if you are willing to cram some of the sites. Depending on the year, there is sometimes a lower sandbar offering more space but this has not been an option lately.
Mile 87.58 – Nugget Creek:
River Left. Nugget Creek and Earl Parrott’s cabin are located on the left.
Mile 87.65 – Parrott Cabin Camp:
River Left. This is a small camp tucked in towards the bottom of the Nugget Creek boulder shore.
Mile 88.26 – Cliffside Rapid:
Class III. The river constricts and has most of the water pushing into the left wall. There are deep holes against this wall so you want to work right and keep working right throughout the rapid.
Mile 88.35 – Cradle Camp:
River Right. This is a beautiful camp with gorgeous views of Cliffside Rapid. Pay attention to your camping permit as Cliffside Camp is further downstream.
Mile 88.48 – Lower Cliffside:
Class III. Unlike the last Cliffside rapid, this one you want to stay close to the wall on the left, especially at high flows.
Mile 88.63 – Tumble Camp:
River Right. Tumble is a large camp located on top of a shelf. Getting to the camp from the boats is difficult, especially while carrying gear. Once up on the bar though, the camp is large and flat.
Mile 89.39 – Ouzel Camp:
River Left. Ouzel Camp is on the left-hand side, just upstream of Cliffside Camp.
Mile 89.59 – Cliffside Camp:
River Right. Often confused with Cradle Camp, which is opposite Cliffside Rapid. This camp has a deceivingly tricky eddy to pull into, so pay attention as you come around the corner.
Mile 89.83 – Ouzel Rapid:
Class III. This is a long rapid, which at lower flows is easy to navigate and quite fun with lots of rock dodging. At higher flows this rapid isn’t an issue unless you are camping at Stoddard, which is located halfway through.
Mile 89.91 – Stoddard Camp:
River Left. This camp is similar to Tumble as it is a large camp located on a tall shelf bar. At all water levels, landing boats here is tricky. During hot days, hiking up Stoddard Creek rewards you with cool pools to soak in. Keep your eyes out for the excellent pictographs up the creek as well.
Mile 90.2 – Otter Bar:
River Right. This is a large secluded sandbar, which makes it a popular camp.
Mile 90.94 – Vinyl Rapid:
Class III. At higher flows pay attention as Rubber Rapid is right around the corner and the current is swift here. At regular flows and lower this rapid is not a big deal. This rapid is also known as Son of Rubber.
Mile 91.03 – Rubber Rapid:
Class IV. Appropriately named as this rapid is well known for turning boats over at higher flows. As the water comes down the rapid loses its teeth but it still has some larger features.
Mile 91.87 – Hancock Rapid:
Class III. A long, meandering rapid. Start river right and towards the bottom after the right turn, make your way back left. There is a large house rock in the center-right of this rapid that you will go right of, before a fun, splashy exit to this rapid.
Mile 92.73 – Solitude:
River Left. This is a very small camp that is only accessible at low water. If your group is larger than 8, then some may need to sleep on rafts.
Mile 93.42 – Devil’s Tooth Rapid:
Class III. Scout Left. This rapid is hard at high water and at low water. At high flows there are large holes here you need to avoid. As the water drops, a large, sticky hole emerges which proves troublesome to rafts and duckies. At low water, take this rapid slow, and aim to miss the Tooth on the left.
Mile 93.58 – House Rock Rapid:
Class III. This rapid has changed recently and is now left all the way through.
Mile 93.8 – Clamshell Rock:
A large boulder in the center of the river reveals a surprise as you pass by it.
Mile 93.93 – Jump Off Rapid:
Class III. Stick to the right and as you finish, avoid the wall coming off of the left shore as it’s possible to flip an oarboat on it, even at low flows.
Mile 94.22 – Geology City:
Class I. Stick to the right as you pass by these cool looking rocks.
Mile 94.6 – Goat Creek Rapid:
Class II. Right of center read and run.
Mile 94.69 – Goat Creek Camp:
River Right. This is a very small beach camp that is non-existent at high flows.
Mile 95.88 – Main Salmon Confluence:
The Middle Fork meets the Main Salmon. If you’re continuing your trip through the Main Salmon, this double river trip is referred to as “Turning the Corner” as you make a sharp left turn at this point and your general compass changes from a northern heading to a west one.
Mile 96.03 – Confluence Boat Ramp:
River Right. There is a boat ramp here that’s occasionally used, but it’s not as good as the one downstream.
Mile 96.5 – Stoddard Pack Bridge:
This pack bridge connects the Stoddard trail to the Salmon River road.
Mile 96.79 – Bridge Rapid:
Class II. Keep your eye out for the ducky eating hole towards the bottom of the wave train.
Mile 97.97 – Cramer Creek Rapid:
Class III. Stay right of center threading the needle between a center hole and rocks on the right. An amazing rapid to finish your trip on with large rollercoaster waves.
Mile 98.79 – Cache Bar Boat Ramp:
River Right. The Middle Fork takeout. Congratulations on finishing the trip.