Southern California, USA
Upper Kern River Rafting Guide
Melting from Mount Whitney and then barreling through the Forks of the Kern, the Upper Kern section begins at Johnsondale Bridge and ends at Lake Isabella. The Upper Kern is well known for two reasons: Plentiful access and a variety of whitewater from Class II to Class V. There are a lot of different sections and nuances with the Upper Kern, so that information is broken out below.


This guide was written by Kern River Outfitters. Kern River Outfitters runs half, full, and two-day trips on the Upper, Lower, and Forks of the Kern. They have more five star reviews than any other rafting company in California. Learn more about them here.
About This Guide
There are seven distinct sections on the Upper Kern. Some of these sections can be linked up creating a continuous run and others have mandatory portages. All but two of these sections are impacted by Fairview Dam and its corresponding diversion. This diversion takes place at the Limestone take out, and ends at the Lickety Split put in, diverting up to 600 CFS of water. In normal or high water years it is irrelevant as there is enough water in the river for you to still be able to run everything. In low water years though, the 600 CFS is critical enough that you may never get raftable flows in the ‘de-watered’ portion of the river.
While there are river gauges above and below the diversion (allowing you to deduct what’s in the diversion, as they don’t always divert 600 CFS), for simplicity sake, most of our river guides go by the gauge in Kernville.
Unlike the Lower or Forks of the Kern, the mileage in the guide resets with each section. We did this because some sections don’t run cleanly into the next and it is pretty unusual to do a true top to bottom trip.
Upper Kern Section Breakdown
The seven different sections are described below from the furthest upstream down towards Kernville. Click on the link to jump to their corresponding section
- Limestone: Class II, III and IV. Not impacted by the diversion dam. It does not continue into another run due to the diversion dam (mandatory takeout).
- Fairview: Class III. Impacted by the diversion dam. You can run into the next section, Chamise.
- Chamise: Class III and IV. Impacted by the diversion dam. It does not continue into another run due to Class VI Salmon Falls (mandatory takeout).
- Ant Canyon: Class III and IV. Impacted by the diversion dam. You can run into the next section, Thunder Run.
- Thunder Run: Class III, IV and V. Impacted by the diversion dam. You can run into the next section, Cables.
- Cables: Class II, III and IV. Impacted by the diversion dam. You can run into the next section, the Lickety Split.
- Lickety Split: Class II and III. Not impacted by the diversion dam. The regular takeout is in Riverside Park in Kernville, however, you can run into the lake too. This is the most beginner run on the Upper Kern.
Rafting the Upper Kern? Our Kern River guide has you covered: 214 waypoints | Live, Offline Location | 100 photos
$9.99 – Powered by FarOut
4.8★★★★★ 25K+ Reviews
Limestone – Class II, III & IV
The uppermost section of the Kern that is accessible by road, the Limestone section of the Kern contains three stand-out rapids, a few smaller rapids, and accessibility that allows running many laps in a day. This section is not impacted by the diversion as it is located upstream of the dam. At flows above 3,000 CFS, this section is recommended for people with strong rafting experience due to the low head dam just below the take out at Willow Point. The rapids at high flows are swift and continuous. A flipped raft can easily get away from inexperienced rafters and end up going over the diversion dam.
Mile 0.0 – Johnsondale Bridge Put-in:
This is the most upstream put-in available on the Upper Kern River. Located under the bridge, there is a parking lot and boat access point on river right.
Mile 0.01 – South Creek:
River Right. South Creek confluences with the Upper Kern at this point. If you were to continue up the road instead of pulling over at Johnsondale Bridge, you will get to South Creek Falls just a few minutes away.
Mile 0.05 – Bridge Rapid:
Class II. Take the left channel. (Even if there is enough water, the right channel is often choked with logs.) Enter far left near the shore. At low water the tree far left at the entrance comes into play, so be aware.
Mile 0.59 – Brush Creek Rapid:
Class II/III. Brush creek makes a right hand turn. Read and run through the rocks.
Mile 0.64 – Brush Creek:
River Left. The creek enters the Upper Kern halfway through Brush Creek rapid. When there’s water, Brush Creek can be kayaked and occasionally rafted.
Mile 0.84 – Alligator Rock:
River Right. A rock that looks like an alligator poking out of the river. This feature marks the entrance to Limestone Rapid.
Mile 0.86 – Limestone Rapid:
Class IV. Enter down the right side to avoid an entrance hole and as you make the turn work back left to avoid rocks and holes on the bottom right.
Mile 0.96 – Limestone Campground:
River Left. This campground is located on river left and offers gorgeous views of the rapid.
Mile 1.19 – Joe’s Diner
Class III/IV. A multifaceted rapid, you will want to start on river right and ferry to the left, inside corner to avoid holes on river right. After making the turn look out for the rock/pour over known as The Greasy Spoon.
Mile 1.39 – Raft Surf Wave:
Around 1,500 CFS a fun surf wave forms at the bottom of Joe’s Diner. Pop into an eddy on river left for easy access.
Mile 1.46 – Betty’s Bakery:
Class III/IV. A two-part adventure; as the river makes a sharp right turn after Joe’s Diner stay in the center, avoiding a nasty recirculating hole on river left. After this first section pick your way through boulders and pour-overs down a straightaway to finish the rapid.
Mile 1.68 – Betty’s Surf Wave:
At flows between 600-1,000 CFS a fun eddy-accessed surf wave forms at the bottom of Betty’s Bakery. When finishing the rapid punch through a wave on river right to get high in the eddy. At flows above 1,000 CFS the hole begins to get sticky and is not recommended.
Mile 2.4 – Willow Point Take-Out:
River Left. If you are using this as a take-out, be sure to catch the eddy on river left at the bottom of the rapid. This is the last take-out before getting to the Fairview Dam. It is very hard to pull a boat back upstream if you miss this.
Mile 2.72 – Fairview Dam:
Fairview is a diversion dam, meaning it pulls water out of the river into a flume and diverts it many miles down river before dropping it to generate power. From this point until KR3 (the powerplant), the river is absent up to 600 CFS.
Fairview – Class II & III
Although the rapids are Class II and III, this is not a beginner run due to the trees.
Mile 0.00 – Roads End Put-In:
River Left.
Mile 0.47- Fairview Rapid:
Class II. An easy rapid down a straight-away, stay river left the whole way.
Mile 0.77- Fairview Campground:
River Left. Not much shade at this campground, but walkable to McNally’s restaurant.
Mile 0.89 – Fairview Bridge:
Used to access the popular Whiskey Flat Trail, this bridge marks an approximate half-way point for the Fairview stretch.
Mile 0.89 – Johnny McNally’s Fairview Lodge and Restaurant:
River Left. McNally’s is a popular steakhouse. The burger stand makes for an easy and delicious lunch as you’re shuttling between river sections.
Mile 1.11 – Jungle Boogie Rapid:
Class II. This rapid is named Jungle Boogie for reason. Be aware of the tress and low lying branches. The current moves slowly, so there is time to make a decision, but you have to make a decision. The rive splits here into two channels around a tree island in the center of the river. Both the far right and the far left go. The far-right is the deeper channel, but you may have to duck under low branches at the entrance. The far-left channel has fewer trees at the entrance but has a rocky exit -point your boat river right and hold on.
Mile 1.43 – The Fence Rapid:
Class II. An easy rapid, stay inside as the river makes a sharp left turn. Also known as “Corner Pocket” because there is a small hole the form in the corner pocket next to the rock wall where the river bends left.
Mile 1.87 – Tobias Creek:
River Right. Tobias Creek isn’t always running but when it is, this is where it comes into the river.
Mile 1.99 – Calkin’s Flat Take-Out / Chamise Put-In:
River Left. This is the takeout for Fairview Run. Immediately below this is the start of Chamise Gorge.
Chamise Gorge – Class III & IV
A local favorite, the narrow granite gorge of Chamise Canyon has everything from big drops to tight, technical lines. At just over 2 miles long, Chamise packs a punch with 7 Class IV rapids and lends itself well for running multiple laps.
Mile 0.00 – Calkins Flat Put-in:
River Left. A large parking area offering dispersed camping with a good shaded beach to launch from.
Mile 0.39 – Helicopter Rock Rapid:
Class IV. The fun begins as the river makes a right hand turn with a shallow, brushy channel on the right. Hug the left side of this brush into a couple good hits, then continue picking your way down the right side. A large boulder in the center-right side of the river must be passed on river right. From there cut immediately back left or continue right through a tight brushy channel.
Mile 0.48 – Sex Rapid:
Class IV-. Start on river right and work right to left through a straight away. Stay inside as the river cuts hard left and catch a large eddy. From there find your line and weave through a couple holes at the bottom.
Mile 0.82 – Violence Rapid:
Class IV. Very similar to Sex; start river right and again dodge some holes working right to left into a very sharp left hand turn. Make sure you’re on the inside of this turn as there is a large hole bottom right. This surfy hole makes the rapid live up to its name and is very hard to get out of at higher flows.
Mile 1.06 – Rock ‘n Roll Rapid:
Class III. Hey-diddle-diddle, right down the middle! Split a couple holes at the top and line ‘er up at the bottom for a steep, bumpy ride.
Mile 1.81 – Satan’s Slot Rapid:
Class IV. After a short reprieve from the action in the first half of the gorge things pick up again with some small waves and boulder-weaving above Satan’s Slot. There are options here, but the easiest is usually to work left to right and slip between a couple large boulders on the right. From here cut back quickly to the center of the river and make a choice. You will see a slot between two boulders in the center of the river. This is Satan’s Slot and is not recommended in a raft. The easiest option at high flows is to take a tight, bony sneak to the right of the slot and punch through some stompy holes to finish the rapid. At normal flows, the main line runs a good-sized drop to the left of the slot. Keep in mind, a right angle and right-ward momentum are needed when running this drop as it is crucial to catch the eddy behind the Satan’s Slot rock to avoid being swept down the shallow, manky left side of the rapid. Once in the eddy ferry back into the current on river right and finish through the munchy holes at the bottom.
Mile 1.92 – Airplane Turn Rapid:
Class IV. A quick, technical rapid directly above Black Bottom Falls, take a tight left-angling slot in the center of the river into a slalom-y airplane turn between pour-overs and boulders. Try to stay on the inside of this s-turn, otherwise the current will push you right into a large boulder, potentially complicating your entrance to Black Bottom Falls.
Mile 2.01 – Black Bottom Falls:
Class IV/IV+. Immediately following Airplane Turn you will be confronted with Black Bottom Falls, where a large boulder in the center of the river marks your decision point. At high water the easiest and safest option is to sneak right of this boulder and continue down the right side of the rapid, skirting in between a granite wall to the right and large holes to the left. The money line, however, is left of the center boulder, where an improbable move into a large drop can help avoid a boat-flipping hole looming just below the drop on the left. Going against all intuition, avoid tee-ing up this first drop and hit it close to the center boulder with a slight right angle to catch the slack water behind the boulder. This should pull you right around the hole, where you can finish the rapid and catch a small eddy nestled between granite slabs on river right. Aptly named for the high number of rubber raft bottoms seen here, flips in Black Bottom must be cleaned up quickly, as there is “no time” before the next rapid just downstream.
Mile 2.07 – No Time Rapid:
Class IV. A fun finish to the gorge, again options abound. A slightly more technical line takes you weaving down the right side for the first half of the rapid before cutting hard left above a boulder/pour-over. From here keep trending left through some hits before teeing up a river-wide hole at the bottom. Another fun option starts right at the top of the rapid angling left, where you’ll pick your way to a sizable center drop. After this drop work slightly left to finish with the bottom pour-over.
Mile 2.34 – Salmon Creek Take-out
River Left. After “No Time” a short flat stretch leads into some riffles. Take-out is on river left just after these riffles, and can be difficult to catch at high-water. There is a small eddy here packed with brush, so allow space to catch the eddy and get out of the way. From here a short but steep carry takes you up to the road; take care crossing. If this take-out is missed there is still some time before Upper Salmon Creek Rapid, but you will have to run a consequential Class IV rapid at the mouth of Salmon Creek that is not recommended. If you find yourself running this rapid stay left, as there is a large surf hole near the bottom of the rapid. Your final take-out option before Upper Salmon Creek Rapid is just below this rapid on river left.
Mile 2.47 – Salmon Creek:
River Left. Salmon Creek enters the river here.
Mile 2.68 – Upper Salmon Falls:
Class VI. Do not run this.
Mile 2.93 – Lower Salmon Falls:
Class VI. Do not run this.
Ant Canyon- Class III & IV
Often overlooked, Any Canyon is an enjoyable Class III and IV run with lots of different options for intermediate boating. It works well as a warm-up to the stout Class V Thunder Run just downstream.
Mile 0.00 – Ant Canyon Put-in:
River Left. A large parking area with a short but tricky carry down granite boulders. Watch for poison oak.
Mile 0.06 – Bombay Rapid:
Class IV/IV+. A huge start to Ant Canyon. Stompy holes (and options) abound. Generally the cleanest line is to enter on river left and slalom between holes and boulders at the top of the rapid. About halfway down you will pass holes in the center of the river and can start working right to punch through big hits at the bottom. There is an eddy on river right at the bottom that can be caught for safety and to catch a breath before Adam Ant waiting just below.
Mile 0.22 – Adam Ant Rapid:
Class IV. After Bombay the river makes a sharp right turn. Stay on the inside right into this turn, as the left side is manky and filled with brush. For the easiest, high-water option stay on the right and continue down the bumpy right channel into a narrow tree tunnel. Another, more exciting option, is to start on the inside right and trend left into the technical, steep left channel which will have you weaving between holes and lining up a good drop at the bottom.
Mile 0.44 – Goldledge Rapid
Class III. A long stretch of continuous, read-and-run class III that culminates in a fun exit bottom right.
Mile 1.04 – Goldledge Campground:
River Left. This campground has a nice beach along the river that is shared among all of the campsites. Some of these campsites have shade. Most campsites feel private because of the boulders and trees between campsites.
Mile 1.19 – Screaming Right Turn Rapid:
Class IV. Run the far left side of a straightaway and continue left through a small, surfy hole as the river splits into two channels. Continue slowly down this short left channel before cutting back hard right through a seam to avoid large features on river left.
Mile 1.33 – Pulling Teeth Rapid:
Class IV. A long rapid best run down the middle, running medium-sized drops and punching through munchy holes along the way.
Mile 1.78 – Upper Springhill Rapid:
Class III. A straightforward, continuous romp! Read-and-run down the middle enjoying big waves.
Mile 1.22 – Upper Springhill Campground:
River Left. This is a dispersed campground and has no facilities.
Mile 2.15 – Lower Springhill Campground:
River Left. This is a dispersed campground and has no facilities.
Mile 2.17 – Lower Springhill Rapid:
Class III+. Start right and weave between a couple holes above a small tree island. Either side of the island goes, just make a decision and stick to it.
Mile 2.44 – Corral Creek Rapid:
Class IV. Just below Lower Springhill the river splits around a tree island. Take the shallow right channel, staying close to the tree island. As soon as possible start ferrying all the way back to the left side of the river and squeeze in between the left shore and a large pour-over to finish the rapid.
Mile 2.60 – Corral Creek Take-Out:
River Left. Take out is just below Corral Creek rapid on the left. A trail leading from a large beach takes you up to the road where you can park on the opposite side. Missing this take-out commits you to running the Class V Thunder Run.
Thunder Run – Class IV & V
The crème de la crème of the Upper Kern, the Thunder Run is the Kern’s biggest and most technically demanding run outside of the Forks. Rapids like Sock ‘Em Dog, The Flume and Fender Bender demand respect and are sure to challenge even the most experienced paddlers.
Mile 0.00 – Corral Creek Put-in:
River Left. Pull off the highway on the right side (heading north) and carry boats across the highway and down to the river. The turnoff for put-in is labeled
Mile 0.35 – Squashed Paddler Rapid:
Class IV. Enter far on river left. Make a right bend around the tree island and work your way towards the right side of the rapid. There are large waves and holes down the center of the rapid.
Mile 0.84 – Sock ‘Em Dog Rapid:
Class V. One of the biggest on the Thunder Run, Sock ‘Em Dog is a favorite. Scouting is recommended.
Mile 1.04 – The Golf Course Rapid:
Class IV. The Golf Course is split into two sections, top nine, and bottom nine. There are many options for both sections. A traditional run for the top nine starts on river left and works back to center. The bottom nine can be run on river right or river left. The rapid is named the Golf Course because of the abundance of holes. Weave your way through the holes for a clean run.
Mile 1.86 – Hospital Rock Rapid:
Class IV. The river is split in two by a long tree island that runs the duration of the rapid. Make sure you are on the left side, as the right side is very bony at most flows. Work your way down the middle of the left channel and prepare for a move to the right. There is an opening in the tree island at the bottom of the rapid. Hug the tree island as you cut right, working your way through a shallow section of river. At high flows, after meeting the other branch of river, prepare to keep momentum going right or cut left quickly at the bottom to avoid a large pour-over in the center of the river.
Mile 2.08 – Hospital Flat Campground:
River Left. Campground located at the bottom of Hospital Rock Rapid.
Mile 2.53 – The Flume Rapid:
Class IV/V. Enter this rapid slowly in the center of the river. A large boulder blocks the middle as you approach the rapid. Get an upstream left angle (facing river right, angled left and upstream), and slowly work into the right side of the entrance just above the center boulder. Behind the center boulder, there is a large ledge hole that takes up a considerable portion of the left and center of the rapid. The “Flume” for which the rapid is named, is a drop just to the right of the ledge hole. Correct your angle to a downstream right angle as you get into the top of the rapid and run the flume drop with a slight right angle. Keep working right below the main drop to avoid pour-overs/rocks in the center and left of the rapid.
Mile 2.53 – Chico Flat Campground:
River Left. This is a dispersed campground. It is generally very crowded (hundreds of people in a small area) and is not a desirable campground.
Mile 2.90 – Fender Bender Rapid:
Class V. The entrance to Fender Bender is very similar to the Flume. Enter with an upstream left angle (facing river right, angled left and upstream), and cut in above the center boulder that blocks the entrance in the middle of the rapid. Correct to a downstream right angle, and run the center drop with a right angle. Prepare to square up to a series of holes and laterals down the duration of the rapid. Many of the top features are angled right.
Mile 3.33 – Thunderbird Put-in/Take-out:
River Left. The takeout is a beach on river left, just above Cables Rapid.
Cables – Class III & IV
An enjoyable Class IV romp, the Cables run is the Kernville classic. Due to its proximity to town and intermediate rapids this is the most commonly run stretch of Class IV whitewater on the Kern.
Mile 0.00 – Thunderbird Put-in/ Take-out:
River Left. This river access point doubles as a both a Thunder Run take-out point and a put-in for Cables.
Mile 0.01 – Cables Rapid:
Class IV. Class IV. One of the longer rapids, Cables clocks in at over half a mile. The typical line is to enter on right side, float down some fun waves, then it is decision time. There is an island in the middle of the rapid. The left side of this island can be run, but can get pretty shallow at lower flows. Enter far left, and bump down some waves as you pass the island. Below here, keep your eyes peeled for some shallow rocks which can become waves/holes. Generally, work back toward the center. The right side is more technical. Be mindful of the Cables Rock – a large boulder with current barreling towards it. Most boaters will back away from this rock to pass it on the left side. If you end up right of the Cables Rock, get ready for a bumpy ride. Past here, work back to the center.
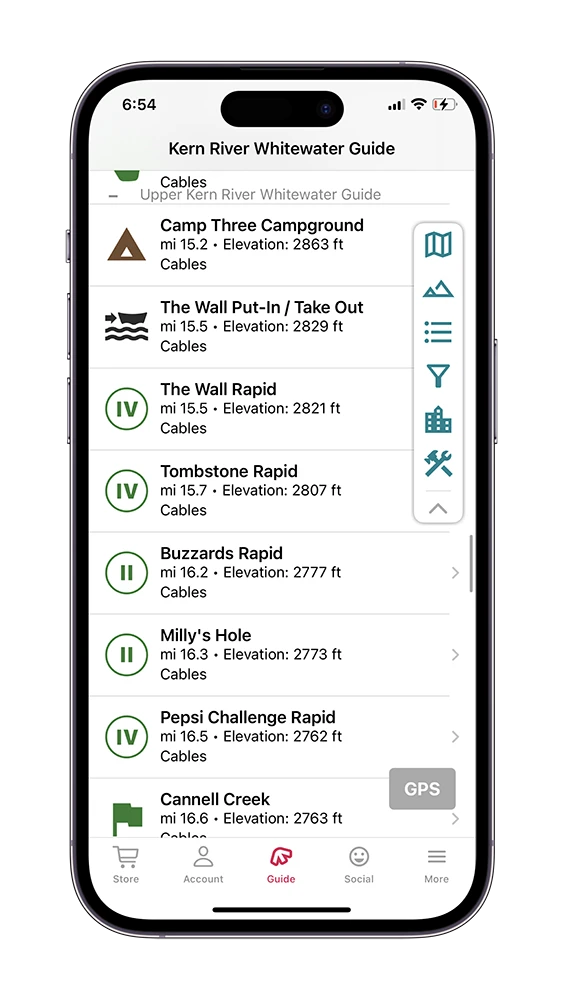
Mile 0.50 – Camp Three Campground:
River Left. Camp Three is an excellent campground for staging Upper Kern rafting trips if you’ll be in the area for a few days.
Mile 0.52 – Raft Surf Wave
: At intermediate flows a fun but difficult to catch surf wave forms at the very bottom of Cables. Rather than running the final wave-train, punch into an eddy just behind a large boulder on river left for access to this surf.
Mile 0.72 – The Wall Put-In:
River Left. The Wall can be run at lower flows than Cables so often times the Thunderbird put-in will be skipped and this one used.
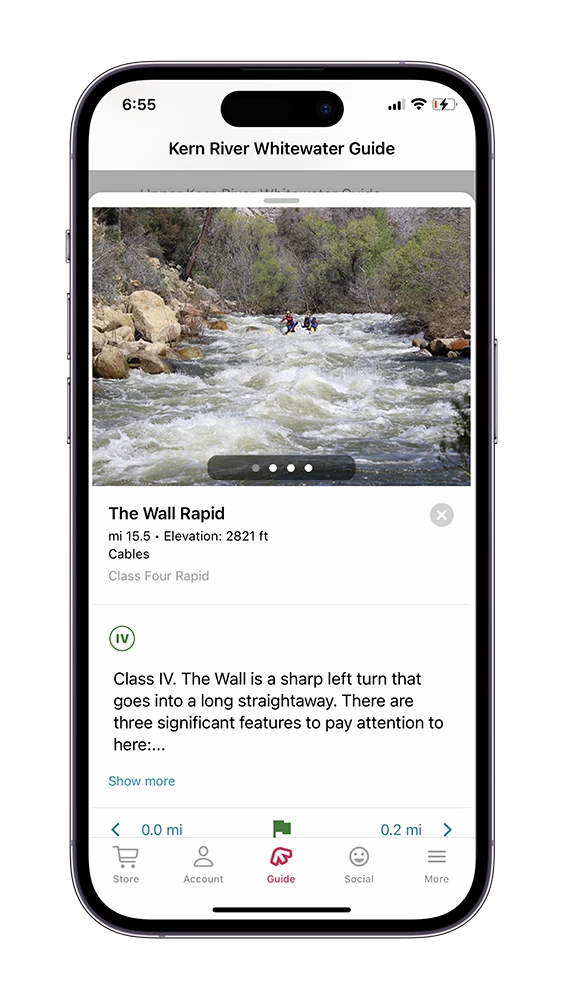
Mile 0.74 – The Wall Rapid:
Class IV. The Wall is aptly named because of the sharp left turn one must navigate to avoid getting pushed into the right bank. Usually entering center and dodging rocks, work left as the river turns and line up for the big waves and holes through the bottom of the rapid. At very high flows (above 4,700 CFS) there is a late final hole dubbed ‘The Cookie Monster’.
Mile 1.00 – Halfway Campground:
River Left. Halfway Campground is a hot campground located just downstream of the Wall Rapid and right before Tombstone Rapid.
Mile 1.00 – Tombstone Rapid:
Class IV. The river forks here (take the right channel) and the class IV starts at the confluence of the two channels. After navigating the class III entrance, work left at the confluence away from the guard rock (keeper hole at large flows) and square up to the holes and waves. Take the middle channel at the bottom being sure not to get pushed up against Tombstone rock.
Mile 1.34 – Headquarters Campground:
River Left. This Forest Service campground has small beaches at the campsites furthest upstream. The campsites are a combination of shaded and sunny.
Mile 1.47 – Buzzards Rapid:
Class II. The river splits into two channels on the right side. Read and run through either the left or right.
Mile 1.52 – Milly’s Hole:
Class II. Around 3,000 + CFS, just below Buzzards Rapid there is a lateral wave on river left that flips boats if you don’t square up to it.
Mile 1.82 – Cannell Creek:
River Left. Cannell Creek enters the river here, but you probably won’t be able to spot it as it is very overgrown.
Mile 1.82 – Tequila Chute Rapid:
Class IV. Take the main channel to the left. As the river goes from a slow turn right into a sharp bend work hard to stay right of center. Avoid getting pushed to the outside as this rapid is shallow and rocky. At lower flows, there is a sticky rock in the main right channel that is hard not to miss.
Mile 1.82 – Pepsi Challenge Rapid (Alternate to Tequila):
Class IV. At the top of Tequila Chute look for a narrow right channel flowing through a boat-width slot in the trees. Hit a series of waves before punching through a munchy final hole and exiting left to meet up with the bottom of Tequila Chute. Only raftable at flows of 3,000+ CFS.
Mile 2.06 – Enchanted Forest
Class II. The river splits around a large island, take the left channel and be mindful of the trees.
Mile 2.14 – Barry’s Wave
: Towards the end of Enchanted Forest, look for a small surf wave, upstream of the climbing wall.
Mile 2.15 – Climbing Wall:
River Left. This tall climbing wall is a great reference point. Please respect their private property.
Mile 2.52 – Powerhouse Put-in / Take-out:
River Left. This is a great put-in if one is looking to increase the difficulty of a run into town without adding bigger class IV runs located upstream. It can also be used as an endpoint if one is looking to only run the bigger sections upstream.
Mile 2.58 – Rivers Edge Camp and Retreat:
River Left. This is considered the best campground for staging private rafting trips. They have their own put-in/take-out and are close to town and the whitewater.
Mile 2.72 – Bull Run Creek:
River Right. If you look at satellite imagery, the confluence of Bull Run Creek and the Upper Kern is hard to figure out. What appears to be occurring is upstream, the Upper Kern splits around an island, with the majority of the river flowing around it to the left. Bull Run Creek enters the river at the right side of the island, by flowing into the former river channel.
Mile 2.82 – Powerhouse Rapid:
Class III. Enter right of center being mindful of shallow rocks. Stay right of center through the first “main” drop. Read-and-run through the rest of the rapid while generally sticking to the river left half after the right bend.
Mile 3.27 – KR3 Hydroelectric Station:
River Left. Remember Fairview Dam, way upriver on the Limestone section? Here is where that water is finally dropped to generate power, adding up to 600 CFS back into the river.
Mile 3.46 – KR3 Take-out:
River Left. This doubles as the Lickety Split put-in so it can be busy here.
Lickety Split – Class II & III
A wonderful and mild section of the Kern River, the Lickety Split is a great option for young families and those new to whitewater. Rapids like Little Momma and Big Daddy provide a great warm-up for the famous final drop at Ewing’s Rapid.
Mile 0.00 – KR3 Put-in:
River Left. This put in is used for the ever popular and relatively mild Lickety Split Run. It can also be used as a takeout if one is just looking to run the bigger stuff that is up-river.
Mile 0.13 – Little Momma Rapid:
Class II. Right after put-in, enjoy this Class II riffle down the right channel of the island.
Mile 0.37 – Beaver Pond:
This is a section of deep, calm water that abruptly ends with Big Daddy Rapid.
Mile 0.53 – Big Daddy Rapid:
Class III. Read and run. Enter center or just left of center and enjoy the ride. At higher flows, a great wave train forms at the bottom of the rapid. The only real concern is running into the right bank.
Mile 0.83 – Straight Shot:
Class II. An easy read and run rapid, this section forks right around a small island but can be bypassed at medium and higher flows to the left. At low water, be ready for some shallow rock dodging.
Mile 1.11 – Rivernook Campground:
River Left. Spread out over 40 acres, Rivernook is a riverside campground that has a variety of options for both tent camping and RV parking.
Mile 1.30 – Freight Train:
Class II. Also known as Little Las Vegas or Camp James Rapid, this rapid flanks Camp James, located on river left. Straight forward, read and run Class II.
Mile 1.30 – Kern River Sequoia RV Resort:
River Left. Formerly known as Camp James, the end of the campground you can begin to see Ewing’s Rapid.
Mile 1.42- Ewing’s Rapid:
Class III. Ewings is one main drop with a hole that only gets bigger with higher flows. Running the drop too far left or right can put you in a less than ideal spot except at high flows when a right sneak line opens up.
Mile 1.43 – Camp Kernville:
River Right. Located immediately below Ewing’s Rapid is this campground and RV park. For some local trivia, this is the only campground along the entire Upper Kern that is located on river right.
Mile 1.73 – Kernville Bridge:
At high flows, it is possible to wrap on the pylons, so pay attention if the water is up. This bridge was destroyed in 1966 when the Kern River hit 60,000 CFS, its highest recorded flow.
Mile 1.73 – Frandy Park Campground:
River Left. Frandy Park mirrors Riverside Park but on river left. There is a takeout located here, but they do charge you to use it.
Mile 1.73 – Riverside Park Take-out:
River Right. IMPORTANT: This is the primary takeout that most rafters use for the Lickety Split. You can continue down the river to the cemetery, but that is not nearly as common. This take-out is in the park that starts immediately after the bridge on river right. The uppermost eddy is generally the best as it minimizes the carry to a vehicle. If missed, there is a final eddy 300 yards downstream at the end of the park.
Mile 1.73- Riverside Park Rapid:
Class II. Mellow rapid that flanks the park. Keep in mind that if you dip into any eddy alongside this rapid, there will likely be fishermen or people swimming, so be mindful of others.
Mile 1.97 – DeChant Flats:
A long, calm section of water starts here and continues for a little more than half a mile.
Mile 2.25 – Crazy Eye Tree:
River Left. Look along the left bank and see if you can spot this special tree. Do you see it?
Mile 2.49 – Chuck’s Channel:
River Left. You’ll see a small to medium sized channel break away to the left. Don’t let your curiosity get to you, so stick to the river. It’s quite a while before this heavily wooded channel meets back up with the main river downstream.
Mile 2.60 – Four Iron:
Class II. This is a long, read and run boulder garden.
Mile 2.92 – Putter Rapid:
Class II. A bit more pronounced than Four Iron, Putter Rapid has the benefit of having Chuck’s Channel re-join the river just above this Class II and add some water. This rapid is also read and run.
Mile 4.60 – Cemetery Take-out:
River Right. One of those take-outs people are just dying to get to. This is the last take-out before you’re really in the lake. Look for an eddy that has a short but steep carry to a dirt parking lot. Not a great takeout but it does add scenic mileage.