Alaska & Canada
Tatshenshini River Rafting Guide
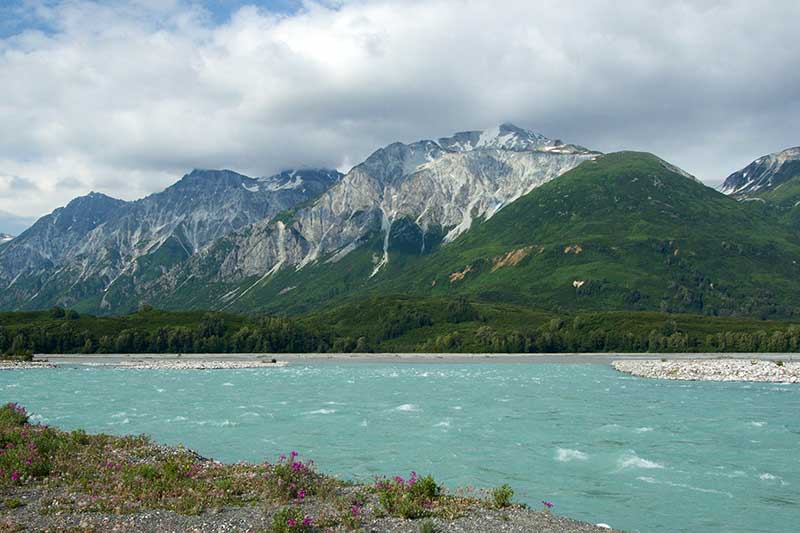
The “Tat” flows through the largest protected wilderness on the planet, a UNESCO World Heritage site including four Provincial and National parks in both Canada and the United States. While the vast range of this landscape is hard to conceive while on the water, the sense of wilderness immersion will inevitably set in. Often, the scope of this trip exceeds previous trips by private boaters. 9-14 days in a wilderness home to abundant wildlife like bears and moose, temperate rainforest precipitation, an international border crossing and bush flight are all part of what makes this trip special.
Be sure to be prepared, but do not be deterred by the challenges! The Tat is one of the great river trips this planet has to offer and should be high on the list of anyone who has the ability to hire a guiding company or organize a private trip.


Quick Note
The data below is lengthy. If you’re looking to get straight to the guidebook, click here.
Private Boaters
Logistics and Permits:
For those with the skills, time, and money, a Private Trip down the Tat is a great option. Groups tend to take 9-12, sometimes up to twenty days on the river. The beautiful part of the permitting system is it sets a definitive take-out date, but not a put-in date. The location of the Tatshenshini encourages most trips to find an outfitter to help facilitate gear and logistics. The best option is Alaska River Outfitters in Haines, AK http://alaskariveroutfitters.com. Local outfitter and guide Andy Hedden has been boating on the Tatshenshini and Alsek rivers for decades and has a unique understanding of what makes these trips successful. Along with renting boats and packing food, Andy runs shuttles to the river, but keep in mind you will need to organize the Canadian border cross and bush flight out at the takeout.
Border Crossing and registration:
Both the Tatshenshini and Alsek involve rafting across the Canadian/United States border. American groups will need to register with customs ahead of time, while Canadian groups need only show their passports. This is the time to pre-check for an unregistered border crossing. These agencies will need a list of participant names, DOB, and passport number. Groups starting in Haines, Alaska will pass through both border offices on the way to the put-in. Bring a photocopy of the same information. While Cannabis is legal on both sides of the border, it is not legal at the border. You will be asked about any cannabis products in the vehicle. There is a limit for alcohol coming from the United States into Canada. Two cases of beer or two bottles of wine or one bottle of liquor is the limit. Border agents know rafting trips bring alcohol with them and will want to know specifics and potentially even have a look in the truck. Knowing the exact amount and having it ready to show should be enough to keep you from a more thorough inspection. The classic mistake is responding with something clever like, “enough for a good time.” Enjoy repacking your vehicle after the search!
Kayakers and Packrafters
Expedition kayakers pride themselves on the ability to do things fast, light, and cheap. That works well for everything on the Tatshenshini other than the flight out. Be sure to reach out to one of the bush pilots for a takeout flight estimate. Packrafts would be a cheaper option for the flight for those who can handle the whitewater.
Private Boaters; Who Should Go?
The Tatshenshini and Alsek Rivers are two of the best multi day trips on the planet. That list is typically topped by the Grand Canyon and Middle Fork of the Salmon, but many consider the Tat and Alsek in a class all of their own. With that being said, the wilderness aspect of this trip is VERY different from anything in the Lower 48 of the United States. Experience, preparation, and judgment are more vital here than any other privately rafted river.
So what does that mean exactly? Boaters on the Tatshenshini and Alsek should have solid Class IV rowing skills that have been tested. At least some group members should have numerous, multi-day rafting trips under their belt. Rowing a few trips on the Grand Canyon, Middle Fork of the Salmon, or Cataract Canyon at decent water levels is likely enough foundation to feel confident on the Tatshenshini. Three trips down the Rogue River is not even close. Rowing the Lochsa, although not a multi-day river, is another good gauge for where your skills should be at. If you are thriving on these rivers, you should be good. If you are just pushing a heavy boat through rapids, getting smacked around, and spit out the bottom you probably aren’t ready. Incidents and accidents are greatly exacerbated in wilderness environments. Consider the time of year you are planning to go. If the canyon is highwater, ask yourself if your group is ready? If not, consider trying for a July or August permit instead of June. Aside from the first day canyon of the Tat, the whitewater is not a major theme of the trip. The major challenge becomes adapting to the braided channels that are unique to glacial-fed rivers. This will be discussed more in detail on the Glacially Braided Channel page.
Aside from the hard skills needed to successfully descend these two rivers, groups need to continuously exercise good judgment throughout the trip. Keeping a bear-safe camp, first aid experience and river rescue skills, tying up boats, anticipating and adapting to rising water levels, navigating icebergs, choosing campsites, managing harsh weather, and boat repair are all skills you should feel confident with before embarking on the trip. Many of these topics will be covered in greater detail in this guidebook.
Takeout Logistics
When your takeout date is set, you will need to coordinate a shuttle from the river to the airstrip, and a flight out of Dry Bay.
Takeout shuttle to the airstrip
Brandt Graber with Alsek River Adventures (https://alsekriveradventures.com) transports gear 1.5 miles from the takeout to the airstrip. Getting assistance with this shuttle is essential. Be sure to look at “Pro Tips” in the takeout section of the guidebook for advice on how to organize gear for the shuttle.
Takeout Flight:
Fly Drake and Yakutat Coastal Air are the two best options for takeout flights from Dry Bay.
Drake is an exceptional pilot based out of Haines, Alaska who has spent decades specializing in mountaineering, backcountry skiing, and assisting rafting groups. Yakutat air is based out of Yakutat, Alaska, and also features some great pilots well experienced with the Tat and Alsek. These pilots stay busy during the summer months so make your takeout flight reservation well in advance. Be sure to look at “Pro Tips” in the takeout section of the guidebook for advice on how to organize gear for the pilots.
Tying off Boats:
Many of the campsites on both rivers do not have the Grand Canyon-style eddies people may be accustomed to. Some campsites, like Towagh Cr. on the Tat, may have no eddy at all. These boats are your lifeline. Each night rafts should be strapped to each other, tied off to multiple bomber anchor points with bomber knots. The Trucker’s Hitch is a great knot that is easy to adjust and when tied off is incredibly solid. If the water is rising from precipitation or hot weather (glacial melt) be prepared to check on and adjust the rafts throughout the night.
Collecting Clear Water:
The main flows of the Tatshenshini and Alsek are heavy with glacial silt. Look for clear creeks and pools to filter for drinking water. Silt will clog filtering devices and make drinking water hard on your teeth. If you need to filter silty water, let it sit overnight in a bucket so the silt can settle to the bottom. Some of the silty tributary confluences will have pools of clear water bubbling up from the silt.
Commercial Rafting
There are a number of Canadian and American outfitters who offer commercially guided trips down both the Tatshenshini and Alsek Rivers. I have experienced working with and highly recommend these three companies.
- Haines Rafting Company
- Chilkat Guides
- Mt. Travel Sobek
Campsites
Established vs. New
Viewed through a wilderness lens, the lack of designated campsites on the Tatshenshini and Alsek gives groups an uncommon level of freedom to explore. If that freedom feels overwhelming to groups, it is easy enough to have a set plan involving well established campsites. This guidebook will give you an excellent foundation of where to find campsites, but keep in mind there are always more places. Exploration of both established and new campsites should not involve manipulation of the landscape. For groups targeting a lesser used campsite you should evaluate what the group impact will be. Large beaches with trees for wind cover are a great option. Smashing down vegetation to set up tents and a kitchen is laborious, leaves an unnecessary mark, and should be avoided unless there is no other option. Oftentimes the well known sites are the best choice because the space needed already exists and our collective impact is reduced to only a few areas.
Whether you are staying at a well established campsite like Walker Glacier, or have discovered an unnamed outwash on the Upper Alsek, everyone needs to uphold leave no trace and bear awareness practices.
Camping Limitations
Glacier Bay National Park limits the amount of layovers, which is two nights at one campsite, between Walker Glacier and Alsek Lake. That essentially means choosing whether to layover at Walker Glacier or Gateway Knob, but not both. With the popularity of these two sights for both Tatshenshini and Alsek groups, the park is attempting to give everyone enough space to see them. As of 2022, the Canadian Park service requires an electric bear fence, bear resistant coolers and bear boxes for the Upper Alsek. This will be checked before the start of the trip. Under no circumstances are people allowed to cut down standing trees for firewood or to create more space.
Wind, Weather, Water
Tents
Wind will be a constant companion on your river journey and should always factor into your decisions. The tent you bring should be able to handle solid rain and wind. Commercial companies use four season mountaineering tents like the Mountain Hardware Trango. You can get away with a three season tent for most trips if it is staked down well.
Pro Tips for Tents
- Always anticipate wind and weather, regardless of the current conditions. Identify where the wind is likely to come from and find wind breaks.
- Use thicker, longer tent stakes that provide a more solid anchor and can be hammered into the rocky ground without bending. Put large rocks on top of the anchor points.
- Keep glacial silt out of the tent zippers. When silt enters the zippers they start to split and malfunction quickly.
- Keep tents zipped up to avoid silt blowing inside.
- Keep tents somewhat close together for bear safety.
- Set up tents one by one as a large group when the weather is bad. This keeps the wind from blowing pieces away and reduces the amount of moisture inside the tent before the rainfly is connected.
- If the weather is good in the morning, place your tent out for a few minutes to let it dry a bit before packing it away. Never miss an opportunity to dry your gear.
- Bring a garbage bag to separate a wet rainfly and the tent body.
Leave No Trace
Fires are allowed on a standing metal fire pan with a fire blanket underneath. Take care the surrounding vegetation does not get burned. When you leave camp, there should be no trace a fire ever occurred. All charcoal should be collected, even the little pieces that fall off the blanket. Scatter the leftover firewood you don’t intend to take with you on the beach. Under no circumstances should you be cutting standing trees for firewood or more space anywhere on the river. Carrying a kitchen tarp is a nice way of collecting all the little bits of food that inevitably fall off the table. Always keep the wind in mind with all camp items, especially trash. Designate a couple people to do a camp sweep before fully departing camp. Micro trash is the most common thing missed or ignored. If you find trash from other groups, please pack it out with you for instant good river karma!
Fires and collect wood:
Fires are allowed on the entire Tatshenshini and Alsek drainage. Anticipate that popular campsites have been picked clean by mid season. It’s typically better to collect wood on the river and bring it with you to camp. Park service requires a metal fire pan, with a fire blanket to prevent scorch marks in the earth. Leave no trace ethics should be a priority with the fire. Clean up any charcoal that escapes the blanket and disperse leftover firewood to maintain pristine campsite sites. It is such a bummer to arrive at a place like Walker Glacier and see charcoal all over the beach.
Only driftwood may be collected for fires. Cutting down trees, dead or alive, is strictly prohibited. While collecting wood, target pieces no thicker than your forearm. These will burn hotter and to completion. Throwing a giant log on the fire will never fully burn, resulting in an ugly charcoal stump that gets left behind. To those who find this type of Leave No Trace to be overkill, on this trip I would encourage you to adapt and embrace the wilderness philosophies that have helped keep this place special. You will be passing through one of the most pristine river corridors in the world so please take pride in keeping it that way.
Glacially Braided Channels
Rafting through glacially braided channels will likely be the biggest boating adjustment for most people. This unique river characteristic occurs when rivers heavy with glacial silt slow down, allowing the silt to build up in the river bed. Sections before a large bend or with less gradient slow down considerably and are the most common places to find braided channels. These braids are constantly changing, never allowing guides most familiar with the area to get comfortable. Standing on the seat of the raft and searching the horizon for the best water is one of the most satisfying experiences of the trip when you get it right, and one of the most frustrating when you don’t.
Our inability to see more than an inch into the opaque silty water makes this style of rafting both challenging and fun. Boaters need to be constantly assessing both the micro and macro of the river. The macro involves looking far downstream, assessing where certain channels go and how that affects your plan for the day. With valleys that are two miles wide, there are a lot of choices on where to explore. While you are getting used to the braids, it is recommended to find the “highway” channels rather than the smaller “country roads”. On a micro level you want to be looking for “bleeders”, “feeders” and wave size. Just like all rivers, larger waves indicate deeper water, small riffling waves indicate shallow water. Bleeder and feeder channels refer to other channels that are either adding or subtracting water. If you see numerous channels diverging or bleeding from your channel, anticipate less water and consider choosing a different channel. If you see channels converging or feeding your channel, anticipate more water and consider staying the course.
Boat spacing on the entire trip should be dynamic based on the section you encounter. Through the Tatshenshini Canyon or Lava North on the Alsek, boats should be close enough to assist with the most likely hazard, flips and swimmers. Through the braided sections the most likely hazard is getting stuck, which means boats should space out. How far spaced out is up to the group, but trailing boats need to give enough space to follow lead boats that will need to make a lot of last minute decisions on what channel to choose. If the lead boat gets stuck, your first priority should be positively pointing the rest of the boats where to go. That might mean a few meters away, or an entirely different channel. Getting stuck is a right of passage through the braids. Anticipate hopping out of your boats on numerous occasions to pull the heavy beast into deeper water.
Swift water stopping is a useful tool for stopping rafts in braided channels famous for having few eddies. Commercial guides will tie or carabiner a line to the outside of the frame on whichever side they need to stop. Setting up with a 45° angle and bleeding as much speed as possible, you can jump from the boat onto the shore a foot before hitting and immediately go into a body belay to slow down and stop the raft. With heavy boats and fast current it might take up to a hundred feet of running along the shore with the boat to fully stop it. Practice and choreograph this skill in a low consequence area before attempting in swift current. This is a challenging but highly effective maneuver on the Tat and Alsek.
Clothing and Gear
Clothing and Gear
Prepare for rain everyday on the trip. The rare trip with endless sunshine does exist, but it’s like chasing a unicorn. Prepare to be as waterproof as possible, with base layers underneath that won’t cool you down if you get wet from rain or sweat. Rare warm days and a nice fire should be utilized to dry any clothes that are wet. You may not have many options further downstream as the weather tends to get wetter closer to the ocean.
Clothing and Gear On the Water
Finding the correct river gear for the Tatshenshini and Alsek is not always easy as the days are so different, and groups attempt to keep gear to a minimum. With most days being fast moving, but with few splashy waves to speak of, traditional attire for the Tatshenshini is rubber rain gear, both tops and bottoms. At highwater, commercial rafting groups now issue drysuits but typically put them away after the canyon. Commercial trips on the Alsek bring drysuits for guests for Lava North, and then fly them out at the Turnback Canyon portage.
Clothing and Gear Private Boaters
For private boaters, if you have a drysuit, bring it. Same goes with dry tops and pants. If any incidents happen on the harder whitewater days you will be happy you had it. If the weather gets harsh later, it will also be a nice resource to have. The reason most commercial trips avoid daily drysuit use is guests find them uncomfortable and the environment is very tough on the gear. If you are planning an Alsek or highwater Tatshenshini you should absolutely have a drysuit. For mellower days, wear your best Goretex rain pants and a shell. Commercial companies give out rubber rain gear because it tends to be cheaper, tougher, and fully waterproof.
Baselayers should be wool and synthetics, entirely avoiding cotton which cools you down when wet. Cotton work pants like Carhartts are nice for camp, cooking, tending the fire, and even some river days. Xtratuf, Grundens, and Lacrosse make below-the-knee boots that most guides wear around camp and on the water.
Solid tents that can stand up to both wind and weather should be brought. Keep the bulky paco pads at home in exchange for camping pads that pack down smaller for the flight out. Commercial companies lean towards four-season mountaineering tents like the Mountain Hardware Trango, but you can get away with something less substantial if that’s not an option.
Clothing and Gear Commercial Boaters
Your guiding outfitter will have the gear to lend you for the trip and clothing recommendations to match that. Reach out to them if you have any questions.
Bears
Bears Overview:
This river system has both Black and Brown bears. Brown bears living more than 100 miles from the coast are known as Grizzlys, and Brown bears living within 100 miles of the coast are known simply as Brown bears or Coastal Brown bears. Brown bears are bigger, dominate the riparian zone where food is more abundant, and are therefore more likely to be seen by river groups than Black bears. While bear sightings are common, negative encounters are certainly not. The pioneer guides on these rivers did an outstanding job of keeping bears wild by keeping food protected and camps clean. Thankfully bears here do not associate rafting groups and campsites with food. A journey down these rivers means continuing that legacy with responsible practices that will keep your group safe, future groups safe, and bears wild.
Bears are a major part of trips down both the Alsek and Tatshenshini Rivers. If you are prepared as a group, seeing bears is a major highlight to the experience. Reality TV shows and movies have created this narrative of bears as bloodthirsty monsters roaming the forest looking for carnage. This is far from the truth. Bears, like humans, are out looking for the easiest meal they can find without the drama.
Bear Preventative Tools:
The goal of any close bear encounter is to make sure the bear can see you and hear you. Issues tend to arise when bears are startled and feel threatened. If you see a bear, inform everyone in the group and cluster yourselves together. If the bear is too close for your comfort, start making noise so the bear can see the location and size of the group. Air Horns are typically a good way of scaring bears away on a hike or in camp. Combined with shouting, an air horn is a great first choice. Anyone making a solo trip to the groover should take an air horn. Each trip should have multiple cans of bear spray on the trip. Read the directions carefully before bringing bear spray into the field. Firearms are not allowed in the Canadian side of the park and are therefore not an option for either river. If you get into an unlikely situation where a bear charges you, stand your ground and keep shouting. Do not run.
Bear Food Storage:
All food and trash should be stored on the rafts in bear proof boxes and coolers unless you are actively cooking. Cold water temperatures mask the smell of food, and the movement of the boats in the water makes it an uneasy target for an exploring bear. As of 2022, there have been no instances of a bear climbing into a raft on either river. Canadian or United States Park Services may have other requirements, but this system works well. Don’t be surprised if certain meals like salmon or steak attract a bear to your camp. On many occasions a bear has shown up on the opposite side of the river, sniffing for the location of cooking salmon. Never leave food, trash, or smelly items unattended in camp.
Burning “smelly” trash on the Tatshenshini and Alsek rivers is an accepted practice. Plastic wrappers that have held food, food scraps, or anything that carries a strong smell should be burned to completion. Although unusual, this prevents groups from attracting bears anymore than they need to. Throwing an apple in a massive river like the Alsek might not seem like a big deal, but it can end up in an eddy at another campsite that bears start to associate with food. The little things really do make a difference in a place this pristine.
Bear Camp Strategies:
The foundational rules for campsites are these. If you arrive at a campsite and a bear is there, choose another campsite. If a bear walks into the campsite, attempt to scare it away. If you are unable to scare the bear away, pack up and leave the campsite.
Bears tend to avoid large groups of people. Consider keeping tents in close proximity each night. Keep airhorns and bear spray out and ready for use.
The entire group should have specific language and strategies for encounters with bears while in camp. For instance, if someone sees a bear in camp they can yell, “BEAR IN CAMP!” That lets everyone know the situation. People should group together, start making lots of noise by yelling, banging pans together, or blowing an air horn. This should be enough to scare any overly curious bear from camp. If a bear wanders into your camp in the evening, alert the group with the same call. Everyone should remain in their tents and start making lots of noise to scare away the bear.
Bear Hiking:
Hiking in groups with bear spray and an air horn should be standard throughout the trip. Many hikes will twist through dense forests where hearing and visibility is reduced for humans and bears. Calling out “HEY BEAR!!!” every few minutes where visibility is limited will help prevent sneaking up on a bear. Shops do sell bear bells, but they tend to be quieter than a nice yell and quite annoying.
Best practices for bear proofing camp
All food and trash should be stored on the rafts in bear resistant boxes and coolers unless you are actively cooking. Cold water temperatures mask the smell of food, and the movement of the boats in the water makes it an uneasy target for an exploring bear. As of 2022, there have been no instances of a bear climbing into a raft on either river. Canadian or United States Park Services may require groups to carry an electric fence with them so check on that before departing. Don’t be surprised if certain meals like salmon or steak attract a bear to your camp. On many occasions a bear has shown up on the opposite side of the river, sniffing for the location of cooking salmon. Never leave food, trash, or smelly items unattended in camp.
Burning “smelly” trash on the Tatshenshini and Alsek rivers is an accepted practice. Plastic wrappers that have held food, food scraps, or anything that carries a strong smell should be burned to completion. Although unusual, this prevents groups from attracting bears anymore than they need to. Throwing an apple in a massive river like the Alsek might not seem like a big deal, but it can end up in an eddy at another campsite that bears start to associate with food. The little things really do make a difference in a place this pristine.
If you arrive at a campsite and a bear is there, choose another campsite. If a bear walks into the campsite, attempt to scare it away. If you are unable to scare the bear away, pack up and leave the campsite.
Bears tend to avoid large groups of people. Consider keeping tents in close proximity each night. Keep airhorns and bear spray out and ready for use. The entire group should have specific language and strategies for encounters with bears while in camp. For instance, if someone sees a bear in camp they can yell, “BEAR IN CAMP!” That lets everyone know the situation. People should group together, start making lots of noise by yelling, banging pans together, or blowing an air horn. This should be enough to scare any overly curious bear from camp. If a bear wanders into your camp in the evening, alert the group with the same call. Everyone should remain in their tents and start making lots of noise to scare away the bear.
Rafting the Tatshenshini River? Our Tatshenshini guide has you covered: 68 Waypoints | Live, offline Location | 15 photos | 130 river miles.
4.8★★★★★ 25K+ Reviews
$19.99 – Powered by FarOut

Dalton Post to the Alsek Confluence – Class II, III, & IV+
The trip starts off with significant whitewater and then mellows out into a calmer pace.
Mile 0 – Put-In at Dalton Post:
The put-in for the Tatshenshini is at Dalton Post, about 100 miles northwest of Haines in Canada’s Yukon Territory. Four wheel drive is highly recommended. Dalton Post is an area shared by rafting groups and fishermen. Be respectful and communicative with any other groups in the area. Private trips typically chose to arrive at the put-in early and launch on the same day, or camp at the put-in and begin early the following morning. If you elect to camp, consolidate vehicles, gear, and tents in a way that allows space for others.
Mile 0 – Opening Stretch:
Class II. The major whitewater of the Tatshenshini comes on day one. Leading up to the Tat canyon is around five miles of swift-moving Class I-II. Take this opportunity to get a feel for the weight of the boat and make any adjustments before the canyon.
Mile 5 – Tatshenshini Canyon:
After five miles of relatively flat water, the river will constrict into a canyon for the next five miles. At high water, this section is Class IV+, potentially Class V given the wilderness environment.
Mile 5.05 – Wall #1:
Class IV. A long, fast moving straight away will lead you into the rapids known as Wall #1 and Wall #2. Stay to the inside (river right) as the river turns to the right. Be aware that lower water exposes rocks and boulders on the inside of turns. The opaque glacial water makes these rocks difficult to see.
Mile 5.2 – Wall #2:
Class IV. Immediately after Wall 1, the river again turns to the right. Same as before, stay off the wall to the inside of the turn (river right). The inside of Wall 2 features larger boulders than Wall 1, especially at low water. Your group plan should be to catch the eddy on river right just after Wall 2 to regroup and prepare for Black Bear Rapid.
Mile 5.35 – Black Bear Rapid:
Class IV. A boulder garden straightaway with numerous waves, holes, and pour-overs, finishing with a sharp left turn. The major hazard here is a hole that sits right of center just above the left hand turn. From the eddy, work your way left of center and remain in this current to avoid the hole and wall at the bottom.
Mile 6.2 – Thread The Needle:
Class III. Nearly a mile of Class III busy water will bring you to Thread the Needle. After a slight turn to the right, catch an eddy on the right to view the two rocks sticking above the surface. Line yourself up to go right between them.
Mile 7.6 – M&M Falls:
Class IV. Oftentimes the most challenging rapid in the canyon, you need precise maneuvering to get this one right.
Mile 11 – Squaw Creek:
River Left. Small, river left tributary. This marks the official end of the canyon. Start looking for wood here as there may be little at Silver Creek and Bridge River campsites.
Mile 11.5 – Silver Creek Confluence:
River Right. This is the best, first campsite available after running the canyon.
Mile 13 – Bridge River Confluence:
River Right. Bridge River is located about one and a half miles below Silver Creek and is another option for camping the first night. There are islands in the Tat directly above the tributary. At high water, you can sneak right of the islands giving you a nice easy approach. Lower water shuts that channel down, giving boats very little time to ferry river right below the confluence. If you nail the approach, look for camping just downstream of Bridge River. The Yukon, British Columbia border is less than a mile below the confluence.
Mile 13.5 – Yukon/British Columbia Border:
The Tatshenshini River passes from the Yukon Territories into British Columbia.
Mile 25 – Detour Creek:
River Right. To the west of the Tatshenshini is the larger Alsek river. The Alsek River’s proximity to larger glaciers makes it subject to more dynamic forces and radical changes than the Tat. One of those dynamic forces is the surging of glaciers which will occasionally form temporary dams in the river. There is a theory that the Tweedsmuir Glacier surged forward to dam the Alsek River above Turnback Canyon creating a lake. The lake levels grew high enough that the Alsek flooded up Range Creek and began spilling over the mountain pass at the top of Detour Creek, into the Tatshenshini. Hence the name, “Detour” creek. Eventually the Alsek found a way through the glacial dam and returned to its natural course. This is a prime example of how wild and ever changing this river system is.
Mile – Hunting Cabin:
River Left. This hunting cabin is the only human structure you will see on the river. It is located on private property and typically used later in the season when float planes can land on the calm channels below the Detour Creek confluence. The hunting cabin should not be visited. You can find good camping, lunch stops, and wood in this section.
Mile 33 – Bear Bite Creek:
River Right. This creek sometimes gets mistaken for Sediments as groups are searching for the more popular campsite. There is plenty of space to camp here. The next major tributary on the right is Sediments Creek.
Mile 35 – Sediments Creek:
River Right. This popular camp has a wonderful hiking trail.
Mile 44 – Alkie Creek:
River Right. At this point the river changes from channelized to braided.
Mile 44.5 – Monkey Wrench Rapid:
Class III. A read and run Class III rapid directly after the confluence with Alkie Creek. The proposed Windy Craggy Mine selected this site to build a bridge that would cross the Tatshenshini. The name of the rapid pays homage to boaters who may have helped disrupt surveying efforts on a bridge that was thankfully never built.
Mile 47 – Unnamed Tributary:
River Right. A large river delta with ample space for a campsite.
Mile 48 – O’Connor River:
River Left. This confluence marks the entrance to the “Wind Tunnel”
Mile 50 – Tkope River:
River Left. This is a major tributary.
Mile 52 – Unnamed Tributary:
River Left. Potential for camping upstream and downstream of the confluence exists but depends on how close the Tat brings you to the trees and more solid ground. There is an eddy with clear water at the very end of the beach, depending on water levels.
Mile 52.5 – Unnamed Tributary:
River Right. Typically the Tat stays on the left side of the valley far away from this tributary. If enough water is going right, there is major potential here for an awesome hike and camping. Don’t force going here unless it looks certain otherwise you could spend the remainder of the day dragging boats.
Mile 56 – Henshi Creek:
River Right. Both “Tats” and “Henshi” creek are named from the original maps that had the text Tatshenshini written across them. The Henshi Creek delta is massive,, measuring in a 1.5 miles at its widest point. There is plenty of space upstream of the confluence for camping, but very little protection from the wind. If the channels cooperate, the best campsite is downstream of the confluence in trees. There is a lot of potential for hiking up Henshi Creek as it remains flat and open for some time. You will likely contend with stream crossings and sections of soft silt along the way.
Mile 58.2 – Unnamed Tributary:
River Left. A small, mostly dry delta with potential for camping and trees to shelter from wind. This delta is a dried outflow channel from the tributary found just upstream. If you follow the dried delta a mile through the forest it will connect with the main tributary. This river valley is flat, narrow, and after three miles of hiking leads into a beautiful canyon. Exploring this rarely visited valley has a lot of potential, depending on how much water is flowing in the tributary.
Mile 61 – Tomanhous Creek:
River Left. The next major delta on river left is Tomanhous Creek. Tomanhous and Tats Creek enter the Tat within 500 meters of each other, channelizing the Tatshenshini significantly. From this zone you can typically hear boulders tumbling on the bottom of the river, giving the illusion of thunder in the distance. The Tomanhous delta extends for nearly a mile before the confluence, providing ample space but only one cluster of trees for wind protection. Downstream of the confluence has another cluster of trees that can be somewhat far from the river.
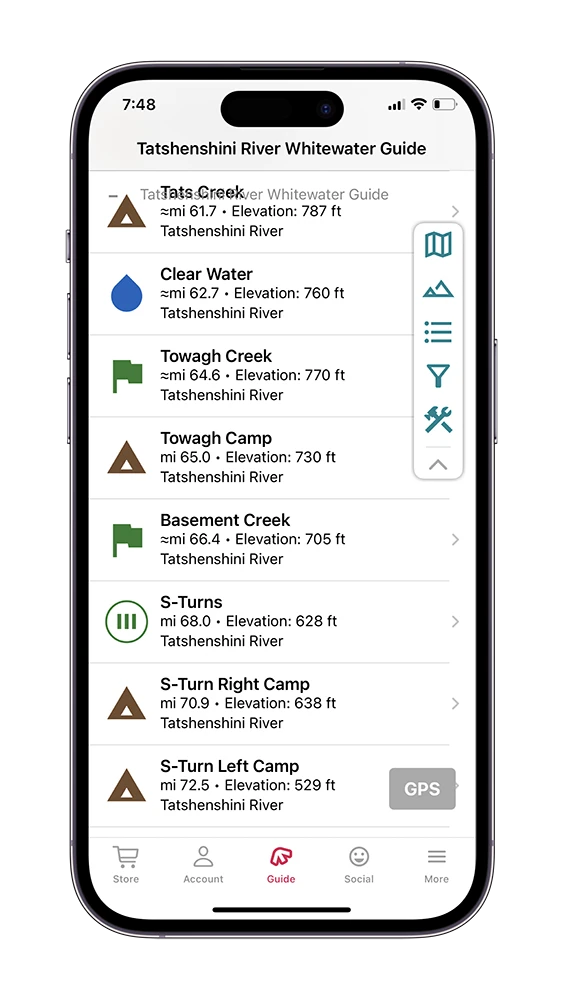
Mile 61.5 – Tats Creek:
River Right. The proposed Windy Craggy Mine was to be located at the headwaters of Tats Creek where large copper deposits currently lay unmolested. Not ideal for camping, but you might be able to find something.
Mile 63 – Clear Water:
River Right. Clear Water pools flowing into the Tat from the forest above.
Mile 64.5 – Towagh Creek:
River Left. An impressive outwash hosting some of the best campsite and hiking opportunities in this stretch.
Mile 65 – Towagh Creek Campground:
River Left. This excellent campground is located just past the Towagh Creek delta.
Mile 66.5 – Basement Creek:
River Left. This is the last major tributary before the river enters into a more channelized stretch called the S-Turns. You may be able to find camping here.
Mile 68 – S-Turns:
Class III+. Channelized series of fast moving S-turns.
Mile 71 – S-Turn Right Camp:
River Right. If there is enough water in the right channel here, you can camp on this beach. Just be sure there is enough water.
Mile 72.5 – S-Turn Left Camp:
River Left. A flat, firm, wooded campsite on river left after a 90° right bend in the S-Turns.
Mile 74.5 – Clear Water:
River Right. Clear water filling into an eddy from the forest above.
Mile 75 – Ninetyeighter Creek:
River Left. Below the S-Turns is a former substantial tributary that has been reduced greatly due to glacial recession. Nightyeighter creek is fed by the Melbern Glacier, and is currently little more than a trickle as its source has slinked further into the mountains.
Mile 77 – Melt Creek:
River Left. Up until this point nearly all of the tributaries of the Tatshenshini have been some shade of steely gray or brown. Melt Creek’s vibrant blue color is a significant change. The Melbern, Staircase, and Konamoxt Glaciers all melt into a massive lake. With no current to carry it downstream, the heavy granite sediment has time to settle to the bottom of the lake. This leaves only minerals that dissolve in the water, primarily Calcium Carbonate, giving the lake and Melt Creek its vibrant color.
Mile 77.2 – Melt Creek Campsite:
River Left. This is a beautiful, popular camp.
Mile 78 – Petroglyph Island:
Petroglyph Island has a trail leading to one of the only signs that indigenous Tlingit and Athabascan people lived in this area.
Mile 80 – Alsek/Tat Confluence:
River Right. The center of the universe.
Confluence to Takeout – Class II, & III
Amazing glaciers and hikes all the way to takeout.
Mile 82 – Reynolds Glacier:
River Right. If you work right at the confluence, you should find enough water heading to the confluence of Reynolds Creek. The upstream side of the drainage should have some clear water pools bubbling out of the silt. If groups were unable to find camping at the confluence, you may be able to find something slightly downstream of the Reynolds.
Mile 85 – Chive Island:
Staying river right after the confluence you will encounter two small islands. The larger is known as Chive Island and is nice place to have lunch, find clear water, and go for a short walk.
Mile 86 – Netland Glacier:
River Left. Exploring river left after the confluence brings boats alongside lush forests with good potential for bear and moose sightings. The Netland Glacier comes nearly all the way to the river, stopping just shy to form a glacial lake.
Mile 90 – BC/US Border:
The widest part of the valley occurs at the Alaska, British Columbia Border. If you look downstream on river right you can see a line cut in the trees outlining the diagonal border. Staying right, but still in the main flow, gives access to a few miles of beaches and trees for potential campsites. Staying left is the faster route to Walker Glacier and gives access to the Nose Hike.
Mile 92 – The Nose Hike:
The left channel directly above Kodak Corner has a challenging hike that gives hikers views upstream to the confluence and downstream to Walker Glacier. From the Alsek, there is a rocky streambed that penetrates the thick forest. Follow the stream bed almost a mile until you can switch back to the right towards Kodak Corner. Continue that course for as long as the views are good!
Mile 95 – Kodak Corner:
River Right. For much of the descent from the Confluence, the river gives the false impression that it will simply dead end at a towering mountain. The alpine glacier above is appropriately known as The End Glacier. Turning the corner opens up the first views of Walker Glacier. Things go from spectacular to breathtaking, inspiring decades of photographs. If the channels look deep and wood free you can elect to take the corner tight to the left to set up a guaranteed entrance to the Walker Glacier campsites. Boats can also stay on the left side of the main flow and look for the best channels leading towards Walker.
Mile 97 – Walker Glacier Camp:
River Left. Walker Glacier Camp can fit three large groups.
Mile 97 – Walker Glacier:
The name Walker Glacier comes from the pioneer raft guides who thought it an appropriate name for a glacier where you could simply step out of your boat and walk on the ice. Whether traveling down the Tatshenshini or Alsek, this was most people’s first opportunity to get up close and personal with the ice. Walking on a glacier is a unique opportunity to understand the nuances within these massive blue sheets of ice carving out the valleys. Feel the power of something ancient and hopefully take a sip of the cleanest water on the planet.
Mile 98.5 – Dipper Creek:
River Right. If you need clear water after leaving Walker Camp, there is a lovely waterfall on river right.
Mile 99 – Sapphire Glacier:
River Left. Sapphire Glacer is notable for its deep, blue color, a result of constantly fracturing ice from long, active icefall.
Mile 101.5 – Salmonberry Slough:
River Right. A large backfilling eddy that extends deeper into the forest than first glance. This is a nice place to take a break from the wind, eat some lunch from the boats, collect clear water for filtering, and eat some salmonberries from the bushes lining the bank.
Mile 101.5 – Cat in the Washing Machine Rapid:
Class III. Confusing waves and holes on the outside of a turn below Salmonberry Slough.
Mile 102 – Unnamed Creek:
River Right. This short creek is fed by the same icefield as the Reynolds Glacier from below the confluence.
Mile 113 – Novatak Camp:
River Right. A half-mile above the Novatak confluence is an old river delta which provides flat, somewhat protected camping. If the weather is good, this is a remarkable place to camp for the night. If the weather is bad and you need to stop before Alsek Lake, consider camping on river left just before the river turns south.
Mile 113.5 – Novatak Glacier:
River Right. The Novatak Glacier comes into view as the Alsek takes another dramatic turn south towards Alsek Lake. On a clear day, this is one of the most remarkable stretches of river. To the north over the Novatak, it is possible to see North America’s second tallest mountain, 19,551ft Mt. Logan. To the west, the Brabazon Range supports lush forests and dozens of alpine glaciers. The south and east expose new vantage points of the Fairweather Range and the substantial valley glaciers ending just above river level. 15,000 ft Mt. Fairweather eventually comes into view beyond Alsek Lake. There is an excellent place to find wood on river left just before the river turns south. There are plenty of clear creeks on river right as you approach Alsek Lake.
Mile 114.5 – Peninsula Hike:
River Left. There is a wonderful hike and potential camping spot on river left above the scout and entrance into Alsek Lake. Get left early and look for a long gravel bar and eddy. There is a trail south that leads through the forest to a corner of Alsek Lake. The hike is easy with ample wildflowers along the way. From this point, it does take some hard rowing to make it river right for the Alsek Lake scout. Strong boaters won’t have much issue, just keep pulling hard.
Mile 116 – Alsek Lake Scout:
When the Alsek transitions from braided to a massive single channel, start looking for an eddy and scree slope on the right to walk up and get a view of the lake. On all but the cloudiest of days you should be able to get a clear view of the lake entrance.
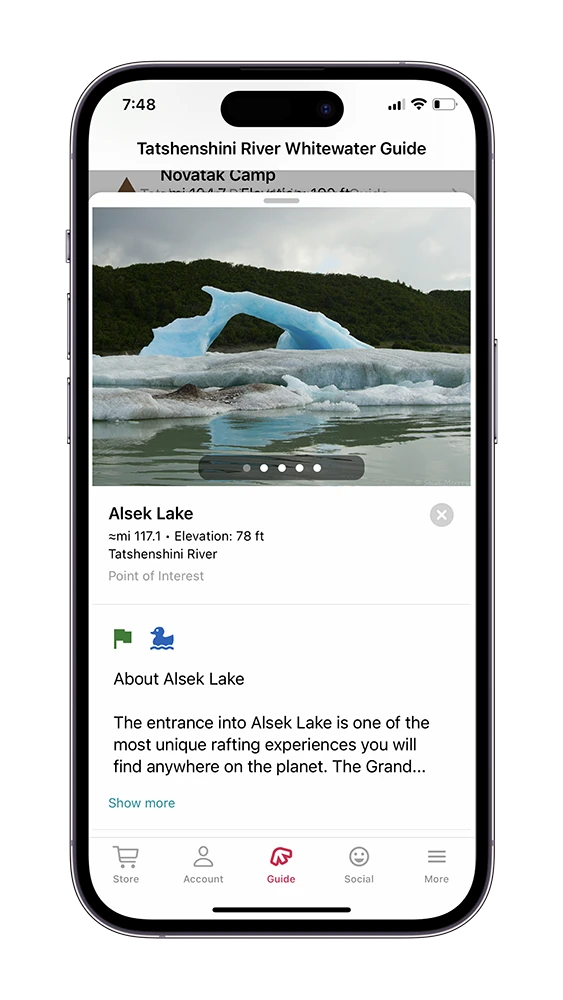
Mile 117 – Alsek Lake:
The entrance into Alsek Lake is one of the most unique rafting experiences you will find anywhere on the planet. The Grand Plateau and Alsek Glaciers descend from the heart of the Fairweather Range to water level, creating a massive lake within the Alsek drainage. Gateway Knob sits in the southwestern corner near the exit of the lake, providing groups with the most remarkable campsites on the drainage.
Mile 117 – Long Island:
A narrow forested island directly north of Gateway Knob. Groups choosing Door 3 will pass Long Island on the right. Groups choosing Door 2 will pass Long Island on the left.
Mile 118 – Gateway Knob:
This is the best camp on the river with a wonderful hike.
Mile 123 – Boat Flipping Wave:
Class III. There is a massive, boat flipping hole in the center of the river three miles from the exit of Alsek Lake that is way too obvious to hit. You can both hear and see it well in advance. Don’t play around with this one, it will eat your lunch.
Mile 128 – Clear Water, Unnamed Creek:
River Right. Commercial groups sometimes elect to fill up water one more time before arriving in Dry Bay. Weather can delay takeout flights so it’s nice to be prepared for all outcomes.
Mile 131 – Alsek River Take-Out and Airstrip:
River Left. The take out is about 11 miles from the exit of Alsek Lake. After a large right turn in the river make sure your boats are positioned on river left. A tall cut bank on river left will give way to a large cobble beach, that’s your takeout. At this point you should have already made arrangements to be picked up by someone from Dry Bay. The airstrip is approximately 1.5 miles away from here.
Mile 131.1 – Former Takeout Channel:
River Left. For years the original rafting groups were able to take a small channel at the end of the takeout beach all the way to the airstrip. The rising land at the takeout due to Isostatic Rebound has made that impossible unless the water is very high. If most of the campsites at Gateway Knob are flooded, you might be able to float this channel all the way. If you think this is possible, stop in the normal spot and walk down to have a look at the channel. When possible, floating to the aistrip is preferable.